
図解ステップバイステップ
Claude Code の Output Style:組み込み5種・切り替え方・自作の作り方
/config を開いて Preferred output style のメニューを1行ずつ読み、あとは動画と同じ流れで自作スタイルを追加する——Markdown ファイル1枚、front matter 3行、同じ一覧にもう1行増えるだけ。
図解 13 ステップ、読むのに約 5 分。各ステップともとの動画の該当秒数へ飛べます。
要点だけ
Output Style が変えるのは「Claude Code の話し方」で、「できること」ではない。/config を開いて Config タブのまま検索欄に output と入力すると、Output style の行から5つの組み込みスタイルを選べる。Default(通常のエンジニアリング用指示)、Proactive(すぐ実行し、計画より行動を優先)、Concise(結果から先に話し、前置きと実況を省く)、Explanatory(実装の判断根拠とコードベースのパターンを説明する)、Learning(小さなコード片を自分で書くよう求めてくる)。自作スタイルは Markdown ファイル1枚で、プロジェクト単位なら .claude/output-styles、全プロジェクト共通なら ~/.claude/output-styles に置く。front matter に name、メニューに表示される description、keep-coding-instructions を書き、その下に本体の指示を続ける。動画では Claude 自身が map-first.md を書き上げ、次にメニューを開くと組み込み5つの続きの6番目に並んでいた。
元動画
本ページは Eric Tech の収録に沿って進める。組み込みのアウトプットスタイルを1行ずつ読み上げ、Claude にカスタムスタイルを書かせ、同じリポジトリを3人のチームメイト向けに3つスタイルで切り替えてみせる。
画像はすべて同動画のスクリーンショットで、権利は制作者に帰属します。本文は当サイトの書き下ろし。手順は動画と Claude Code 公式ドキュメント照合済み(2026年9月確認)。
まず設定の場所を探す
開く限り、画面のどこにも Output Style の文字はない。スイッチは /config の Config タブ、検索欄で絞り込んで見つける。
- 1
ふつうのセッションから始める
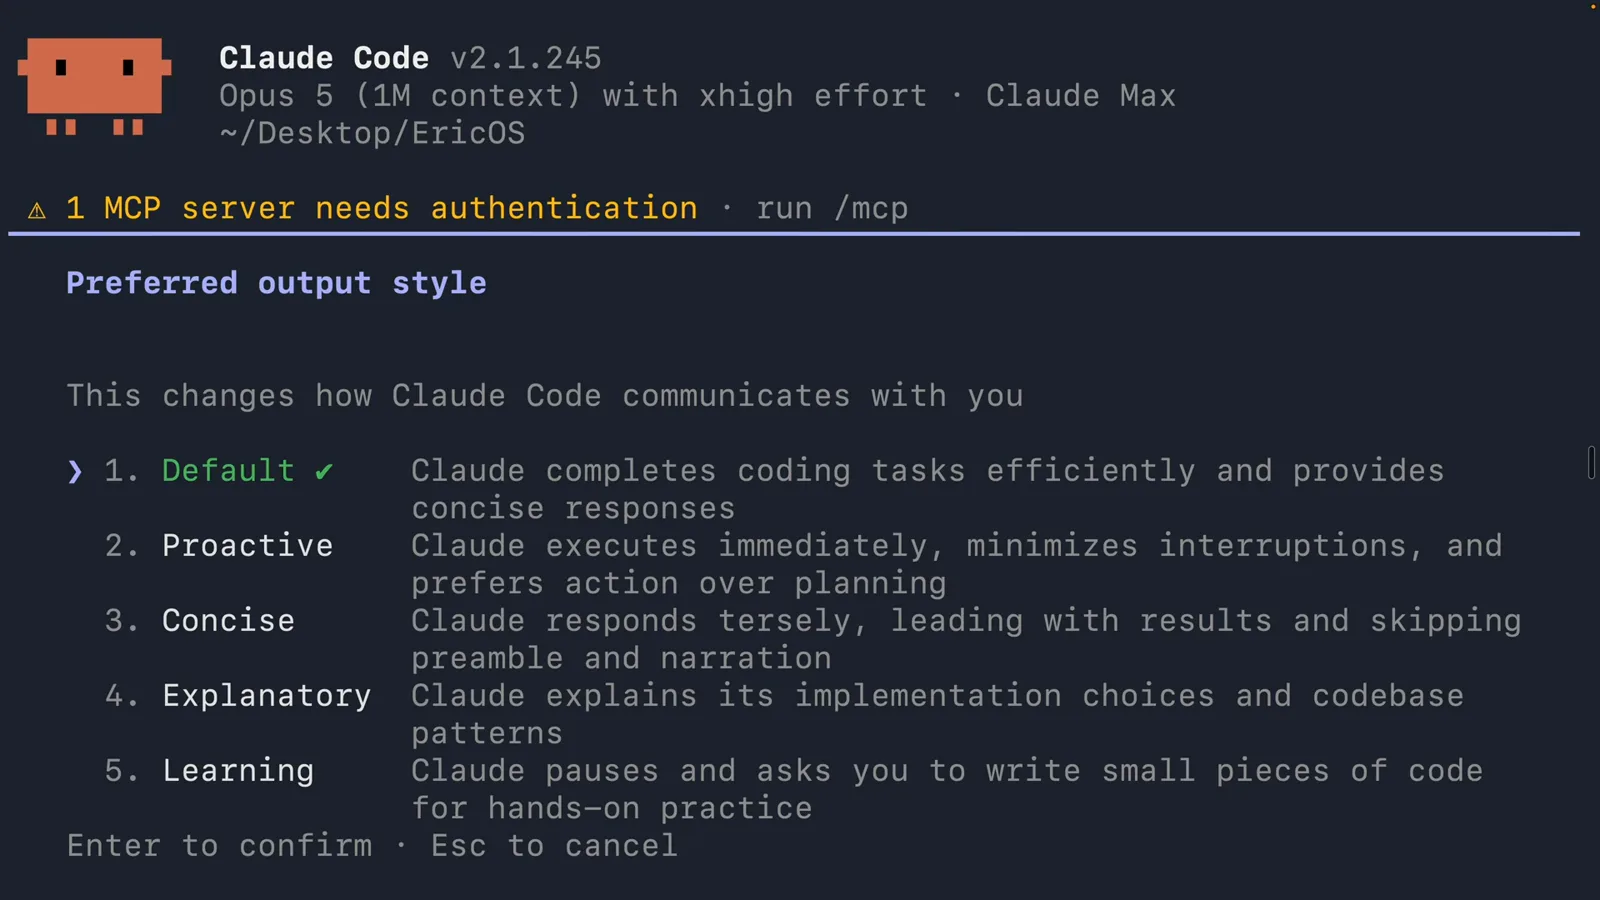
この時点では、アウトプットスタイルに関する表示は何もない。ごく普通の Claude Code セッションで、v2.1.245、Opus 5 の 1M コンテキスト、effort は xhigh、プランは Claude Max、作業ディレクトリは ~/Desktop/EricOS。上部にはいつもの '1 MCP server needs authentication' の警告も出ている。バージョン表示はあとで効いてくる。これから開くスタイル一覧はバージョン依存で、この機能が出たばかりの頃は組み込みの数はもっと少なかった。
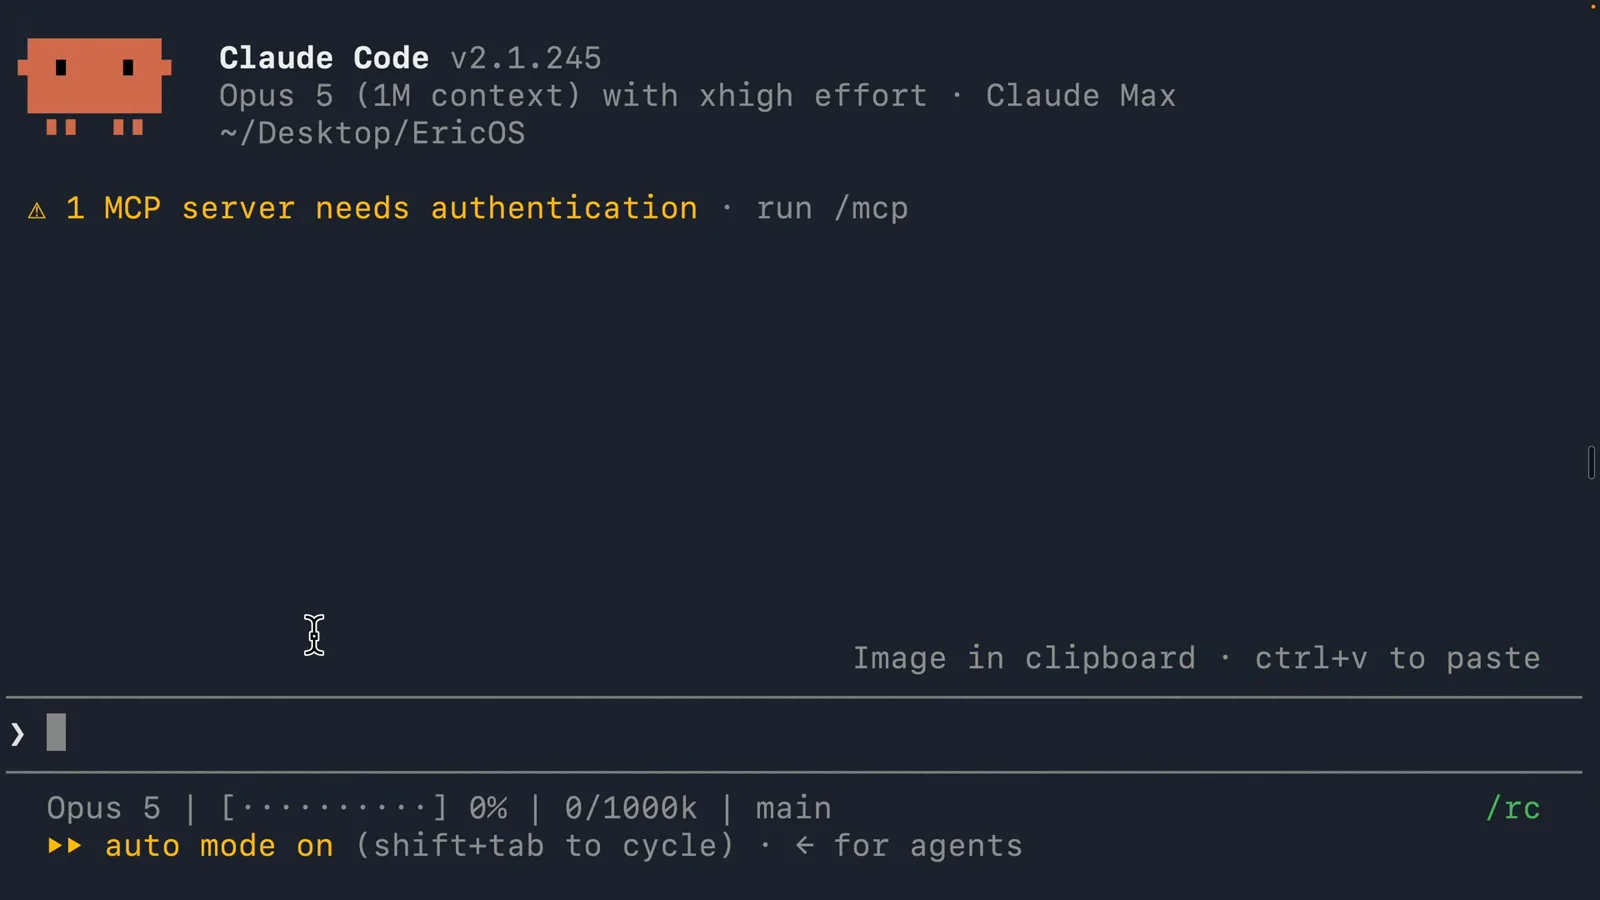
この画面にはスタイル名が1つも出てこない。Default とはつまり、何も触っていないときの Claude Code そのもの。動画の 2:38 から見る - 2
/config を開いて Config タブにいることを確認する
/config と入力すると、5タブの画面が開く——Settings、Status、Config、Usage、Stats。上部に Search settings 欄、その下に2カラムのトグル一覧が並び、Auto-compact true、Reduce motion false、Thinking mode true、Session recap true、Rewind code (checkpoints) true、Ultracode keyword trigger true、そして '32 more below'。この32件をスクロールする必要はない。検索欄に output と打てば、一覧は2行になる。
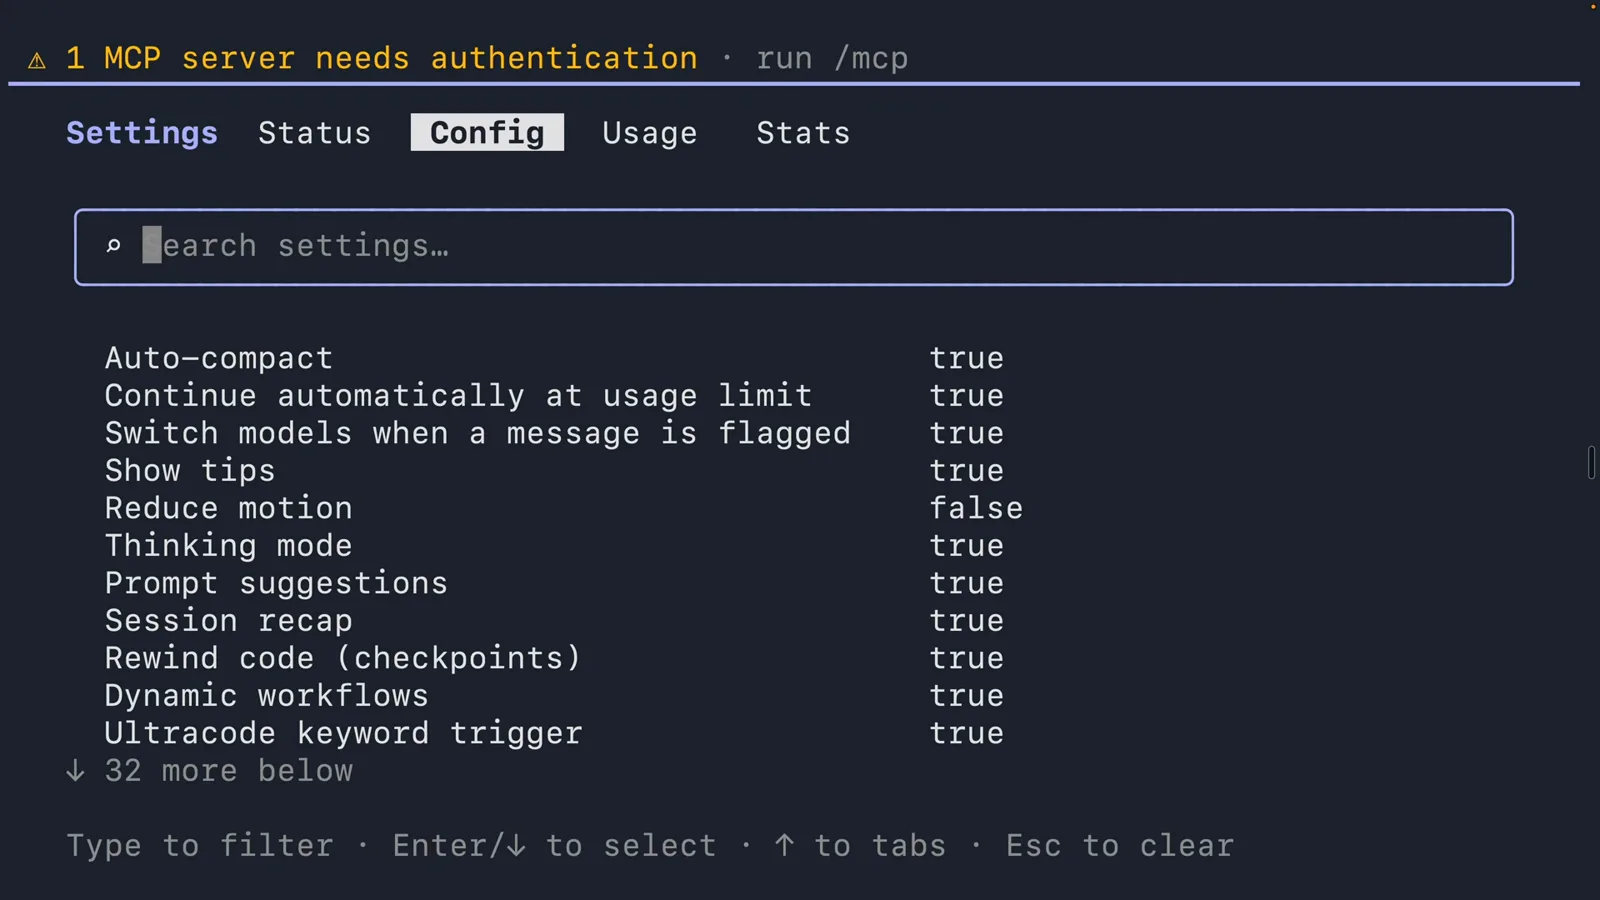
検索欄が近道。使わないと Output style は40行前後の中の1行にすぎない。動画の 2:46 から見る - 3
Preferred output style メニュー
Output style を選ぶと、画面全体が 'Preferred output style — This changes how Claude Code communicates with you' に変わり、番号付きの5項目が各自の説明文付きで並ぶ。1. Default(チェック付き=現在これ)'Claude completes coding tasks efficiently and provides concise responses'、2. Proactive 'Claude executes immediately, minimizes interruptions, and prefers action over planning'、3. Concise 'Claude responds tersely, leading with results and skipping preamble and narration'、4. Explanatory 'Claude explains its implementation choices and codebase patterns'、5. Learning 'Claude pauses and asks you to write small pieces of code for hands-on practice'。Enter で確定、Esc でキャンセル。
この画面は3つを同時に印付けている。緑のチェックが「今効いている」スタイル、色付きの > がキーボードカーソル、灰色の > はマウスが乗っている場所。この3つは別物だ。動画の 2:52 から見る
組み込み5種を読み比べる
選び間違えないよう、メニュー側が1スタイル1行でトレードオフを書いてくれている。
- 4
Concise が削るのは実況であって仕事量ではない
マウスポインタを 3. Concise に合わせて、もう一度読み直すこと。変わるのは回答の形であって、その裏の作業量ではない。ドキュメントは明確に書いている。Concise でもエンジニアリングの品質は Default と同じだけ徹する、と。さらにエラーレポート、セキュリティ警告、破壊的操作の確認文は、どのスタイルでも内容は省略されない。Concise は Claude Code v2.1.237 以降限定で、これが「組み込みは3つ」と書く古い記事が残っている理由でもある。
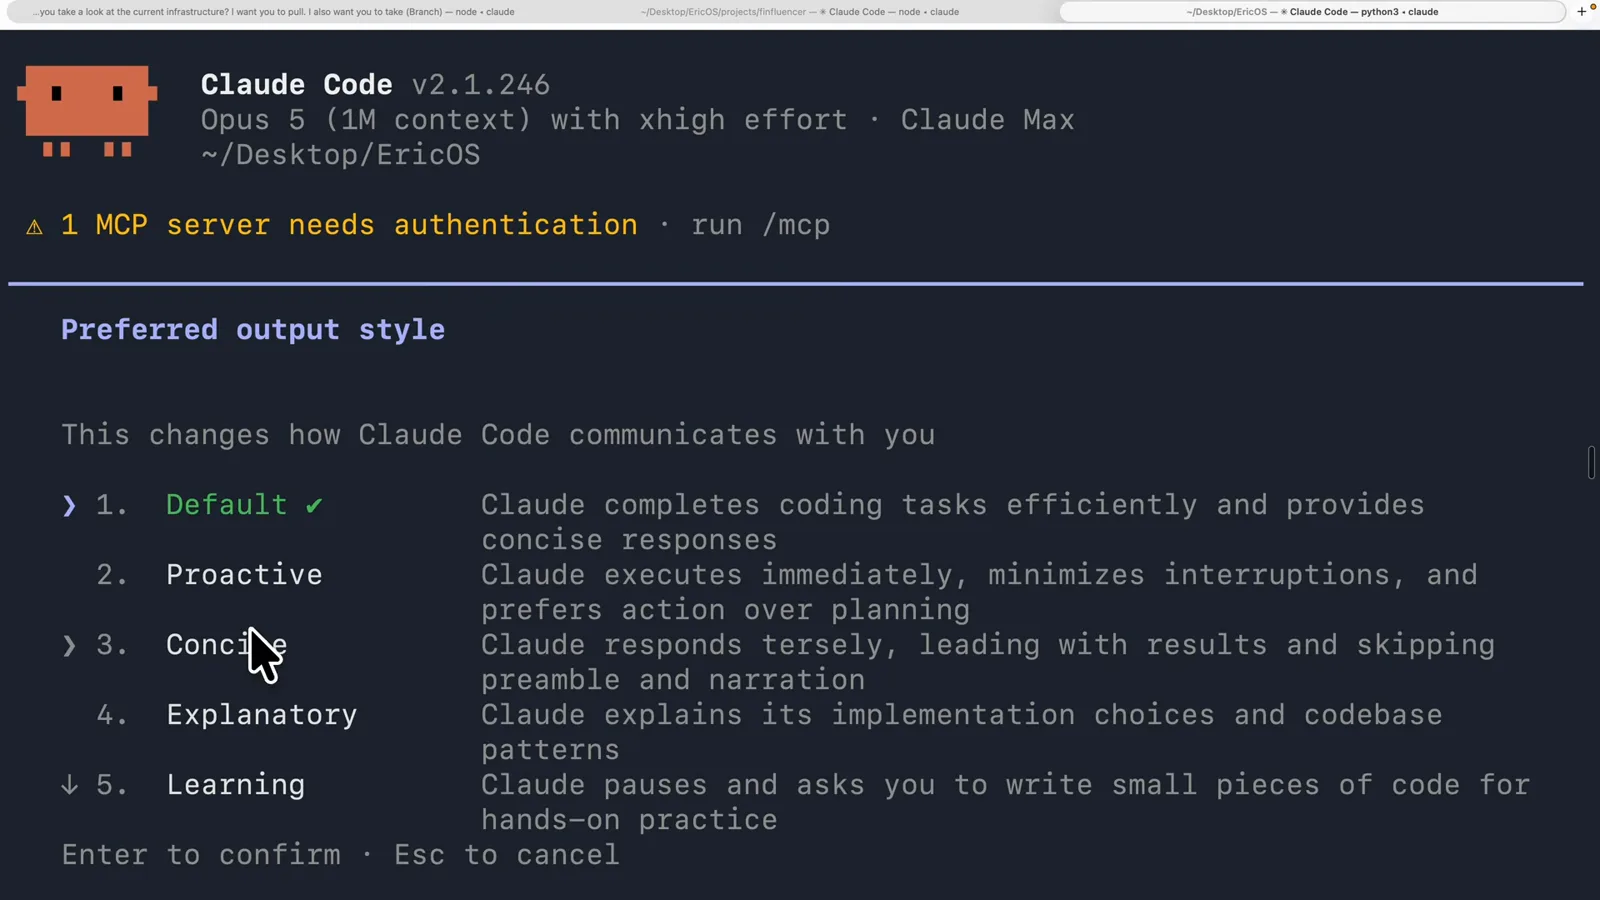
不満が「長すぎる」であって「雑」ではないなら、まずここから試す。動画の 5:18 から見る - 5
Proactive は auto mode とは別物
2. Proactive がいちばん誤解されている。メニューの文言は 'executes immediately, minimizes interruptions, and prefers action over planning' だが、ドキュメントにはメニューに収まらない一文が足してある。auto mode より強い自律実行の指示で、しかも permission mode は変更しない——つまり「聞いて実行してよいか」を決めているのは今も permission mode の側だ。Proactive が変えるのは判断の語り口で、permission mode が決めるのは実際に手を出せるかどうか。
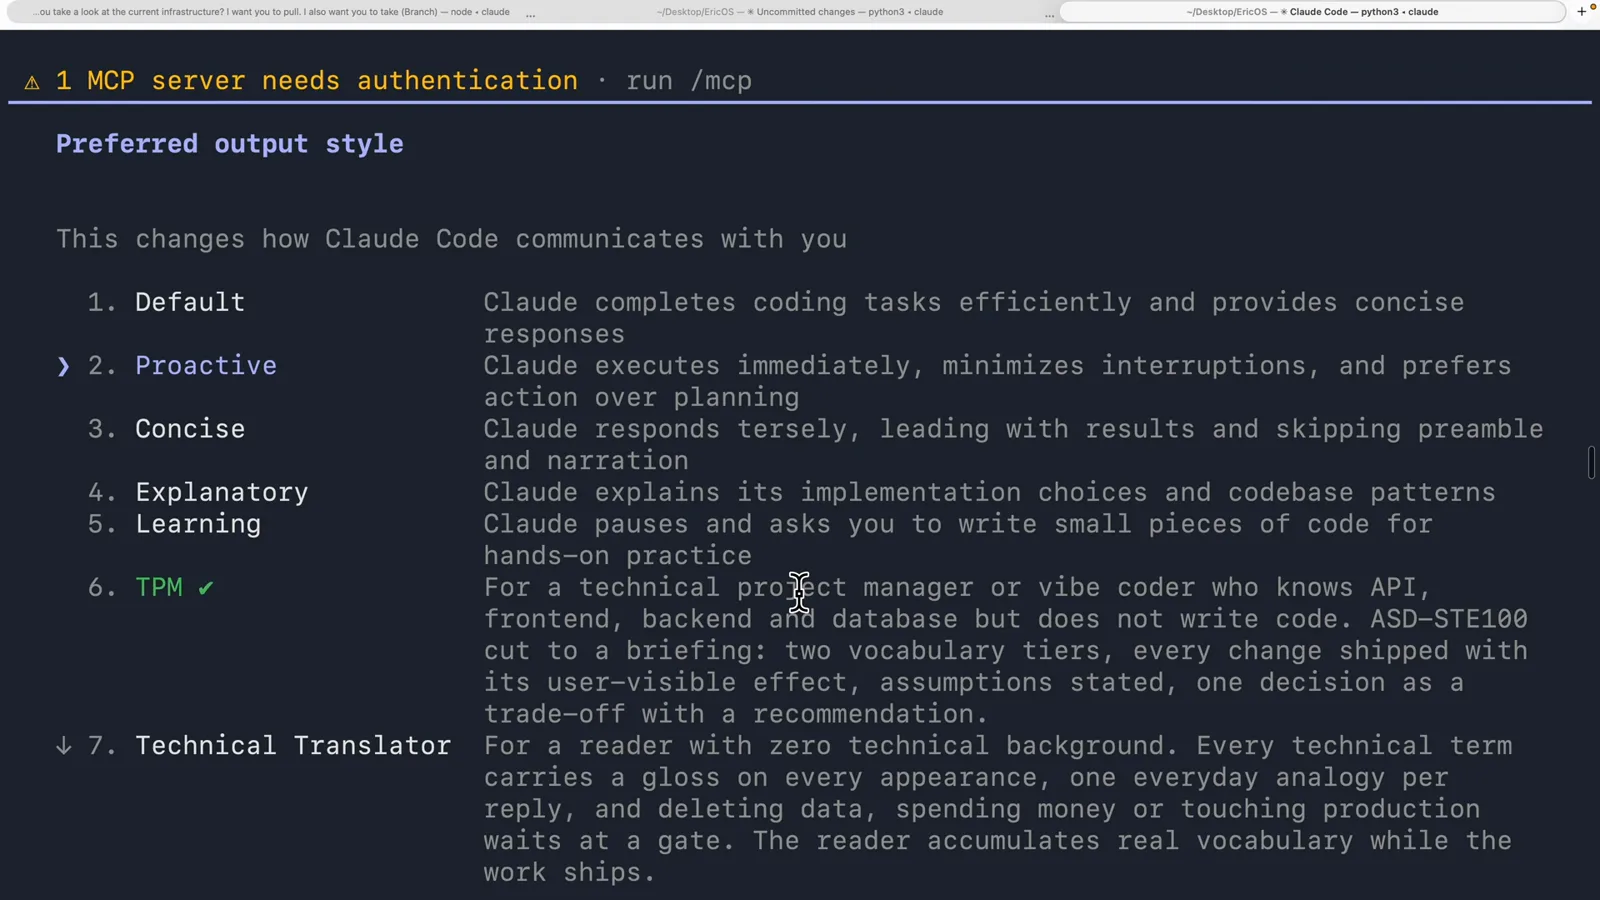
2つはセットで意識する。片方は語り口、もう片方は被害範囲。動画の 14:16 から見る
カスタムスタイルを作る
実体は Markdown ファイル1枚、front matter 3行と本体の指示だけ。書きたくなければ Claude Code に書かせることもできる。
- 6
Claude にスタイルを書かせる
最初から Markdown を手で編集する必要はない。著者は自分の手順で進める。気に入らなかった回答を取り上げ、同じ内容で3つか4つのバリエーションを出させ、残したいものを1つ選び、それをアウトプットスタイルにまとめさせる。下の返信がその結果で、'Built. "Map First" is your sixth output style, and you can select it right now' の直後に保存先が続く——EricOS/.claude/output-styles/map-first.md を ~/.claude/output-styles/ にシンボリックリンクしたので、どのプロジェクトからも使える、と。そのあとに、このスタイルが固定するルールが平文で列挙されている。
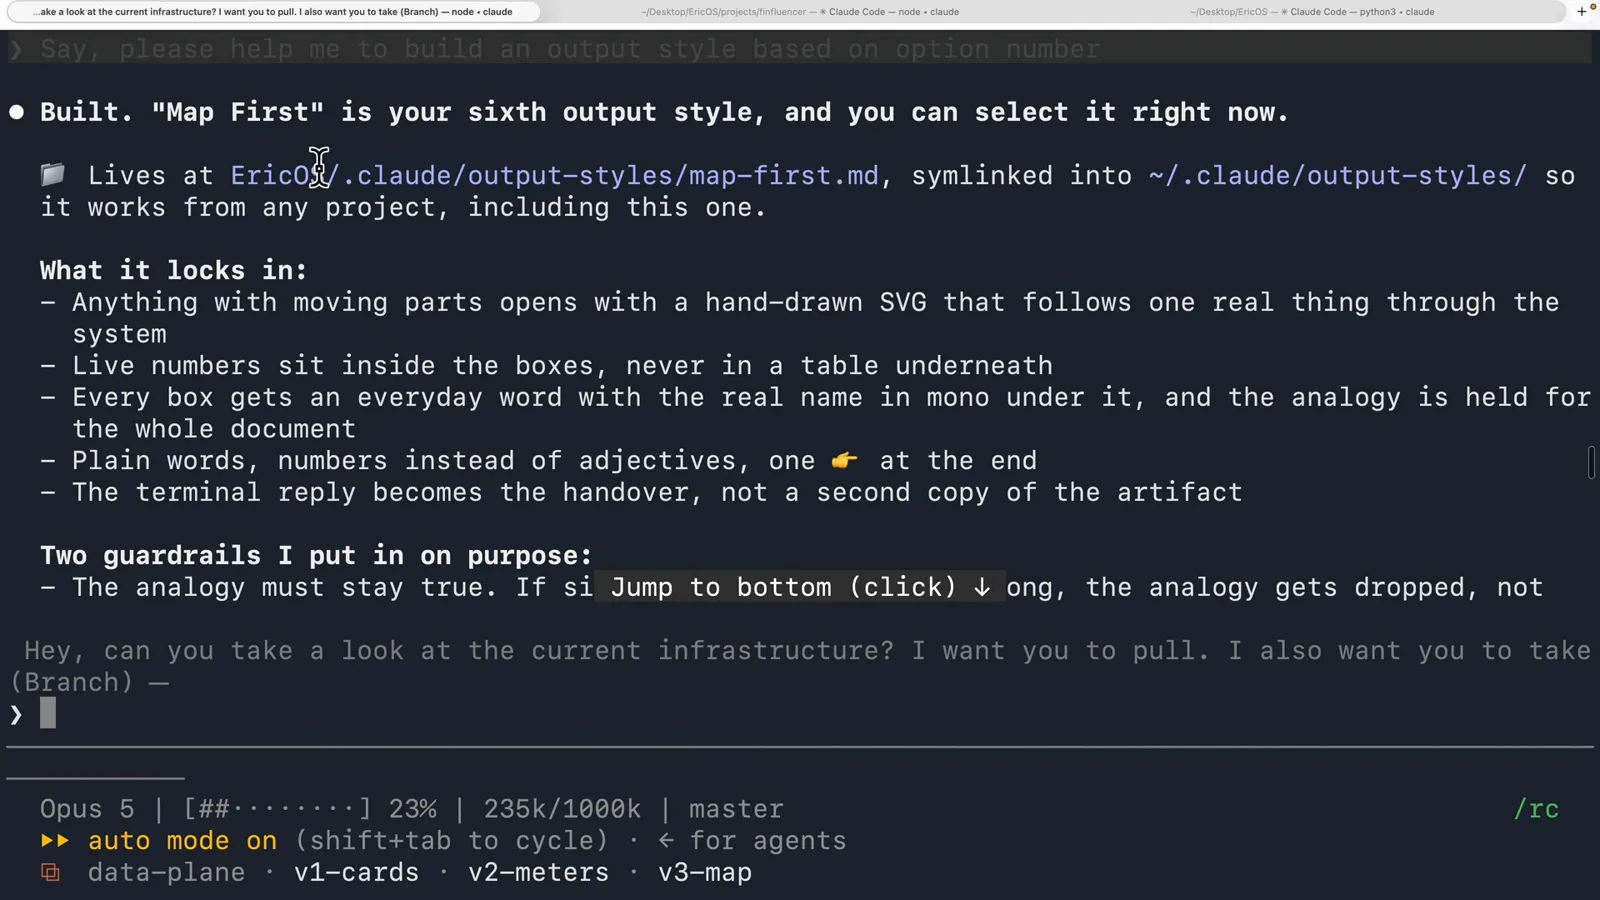
1行にパスが2つ。プロジェクト側に実体、ユーザー側にリンク、これで持ち歩ける。動画の 5:14 から見る - 7
自作スタイルは同じ一覧の6番目に並ぶ
メニューを開き直して下へスクロールすると、1〜5は組み込みのまま、6番目が Map First で、説明文は front matter からそのまま引かれている——'Opens every explanation with a drawn map of how the thing actually works, live numbers on the picture, everyday words with the real names underneath. The terminal stays short and hands over the link.' メニューが自作スタイルについて表示するのはこの1行だけなので、自分用のメモではなく、読み手が選ぶか迷わないための判断材料として書くのが正しい。
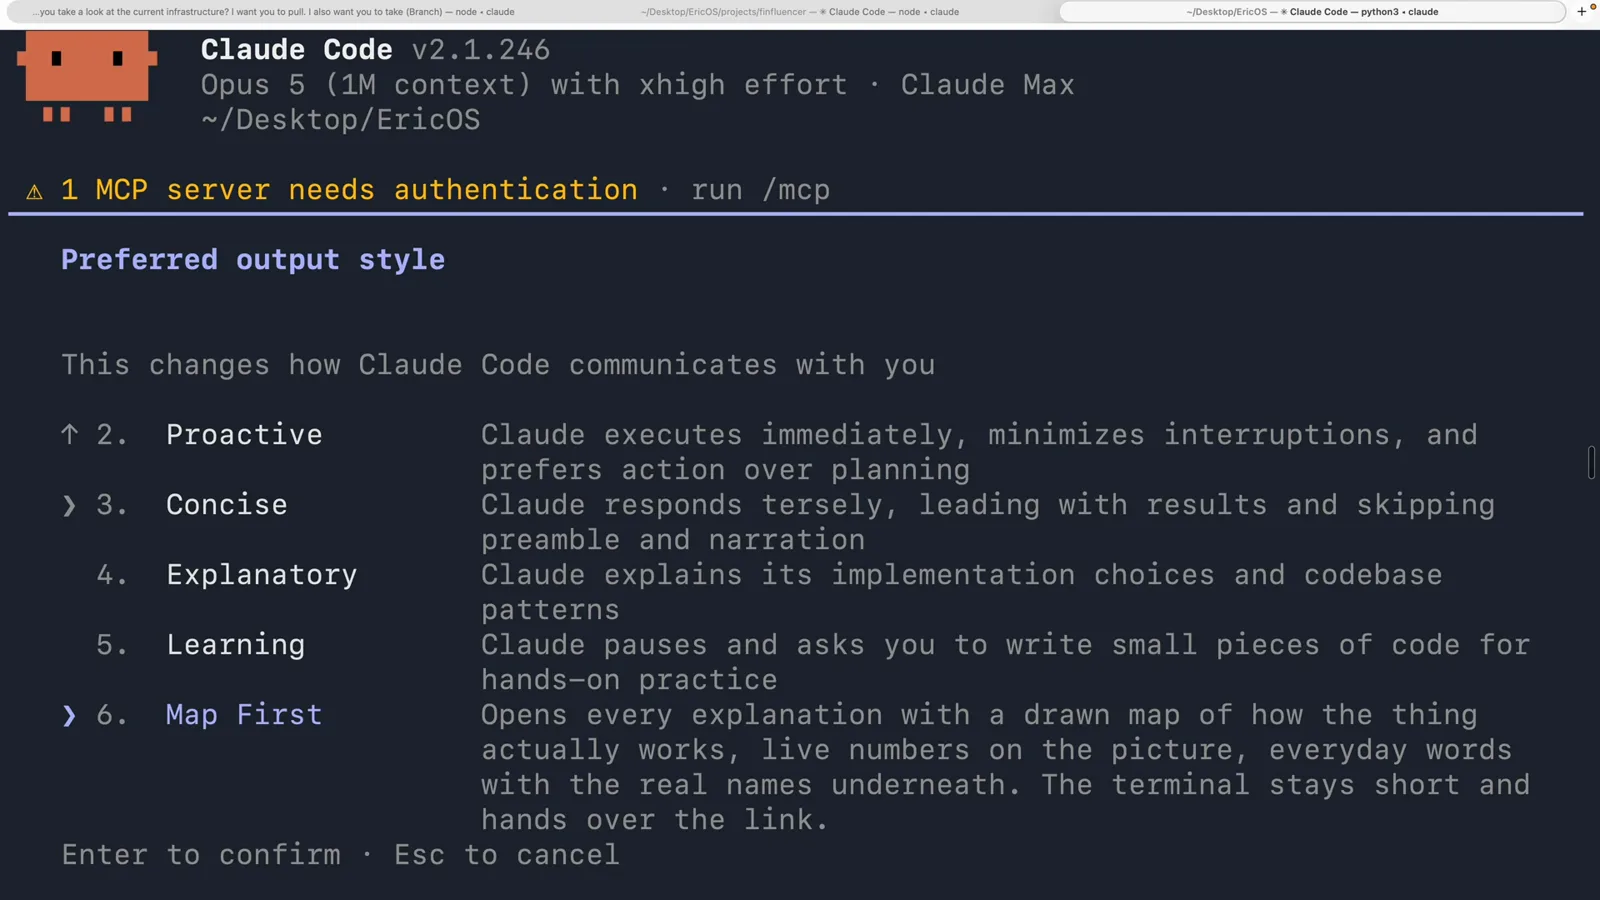
ファイルは map-first.md、表示は Map First。front matter の name がファイル名より優先される。動画の 5:26 から見る - 8
ファイル本体はどんな形か
スタイルファイルは front matter 3行と、その下の指示文だけ。動画の冒頭で引用される例——制作者が Anthropic のエンジニアだと紹介する Lydia Hallie の投稿に写る、.claude/output-styles 内の eli5.md——はテンプレとしてよくできている。name: ELI5、description: keep it simple pls、keep-coding-instructions: true、そして本文は短い命令文の連なり('Small words, short sentences, short paragraphs'、'Just tell me what you did, did it work, what do I do now'、'Keep paths and commands exact')。この keep-coding-instructions: true が、Claude Code 組み込みのソフトウェアエンジニアリング指示を残すかどうかのスイッチ。書かなければ既定は false で、そもそもエンジニアリングをしないスタイルならそれで正しい。
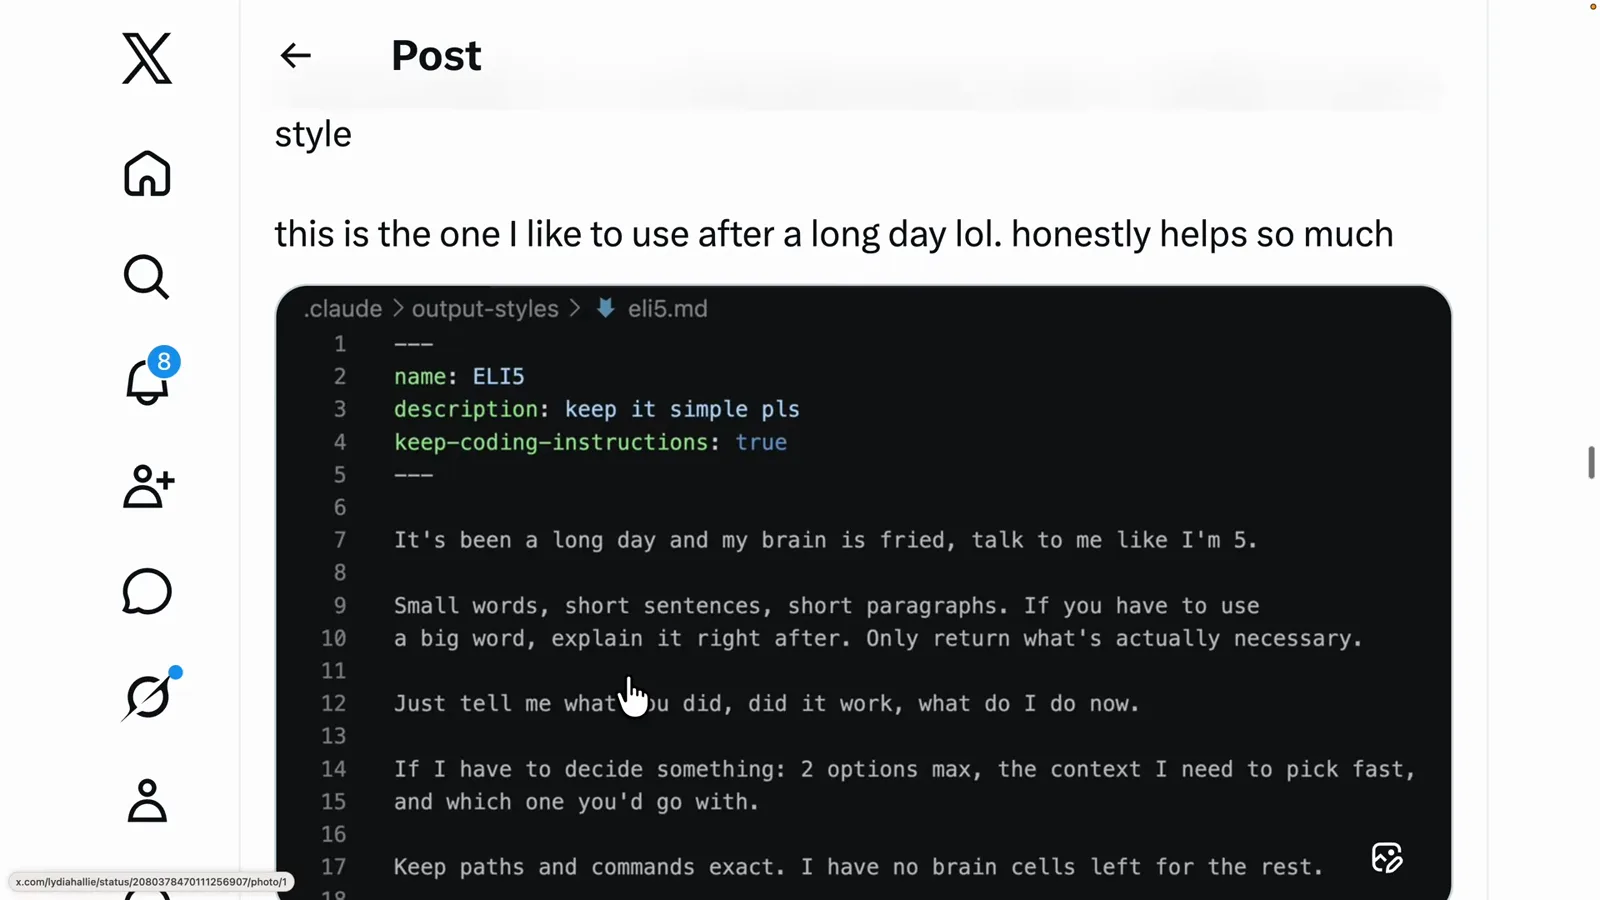
この場面は動画では投稿画像としての表示で、実セッションではない。見るべきはファイル形式のほう。動画の 13:20 から見る
切り替えれば、そのまま残る
選択は設定値として保存される。セッションの最初のメッセージで毎回言い直すものではない。
- 9
選択は設定値として保存される
スタイルを選んだあと /config を output で絞り込むと、画面は2行だけになる。Verbose output false、そして Output style Map First。仕組みはこれで終わり——毎回言い直す好みではなく、保存された値、というだけだ。ファイル名もドキュメントに明記されている。選択は .claude/settings.local.json に local project レベルで書き込まれるので、効くのはそのマシン上のそのチェックアウト。メニューを使わず、この JSON の outputStyle フィールドを直接編集しても同じ。
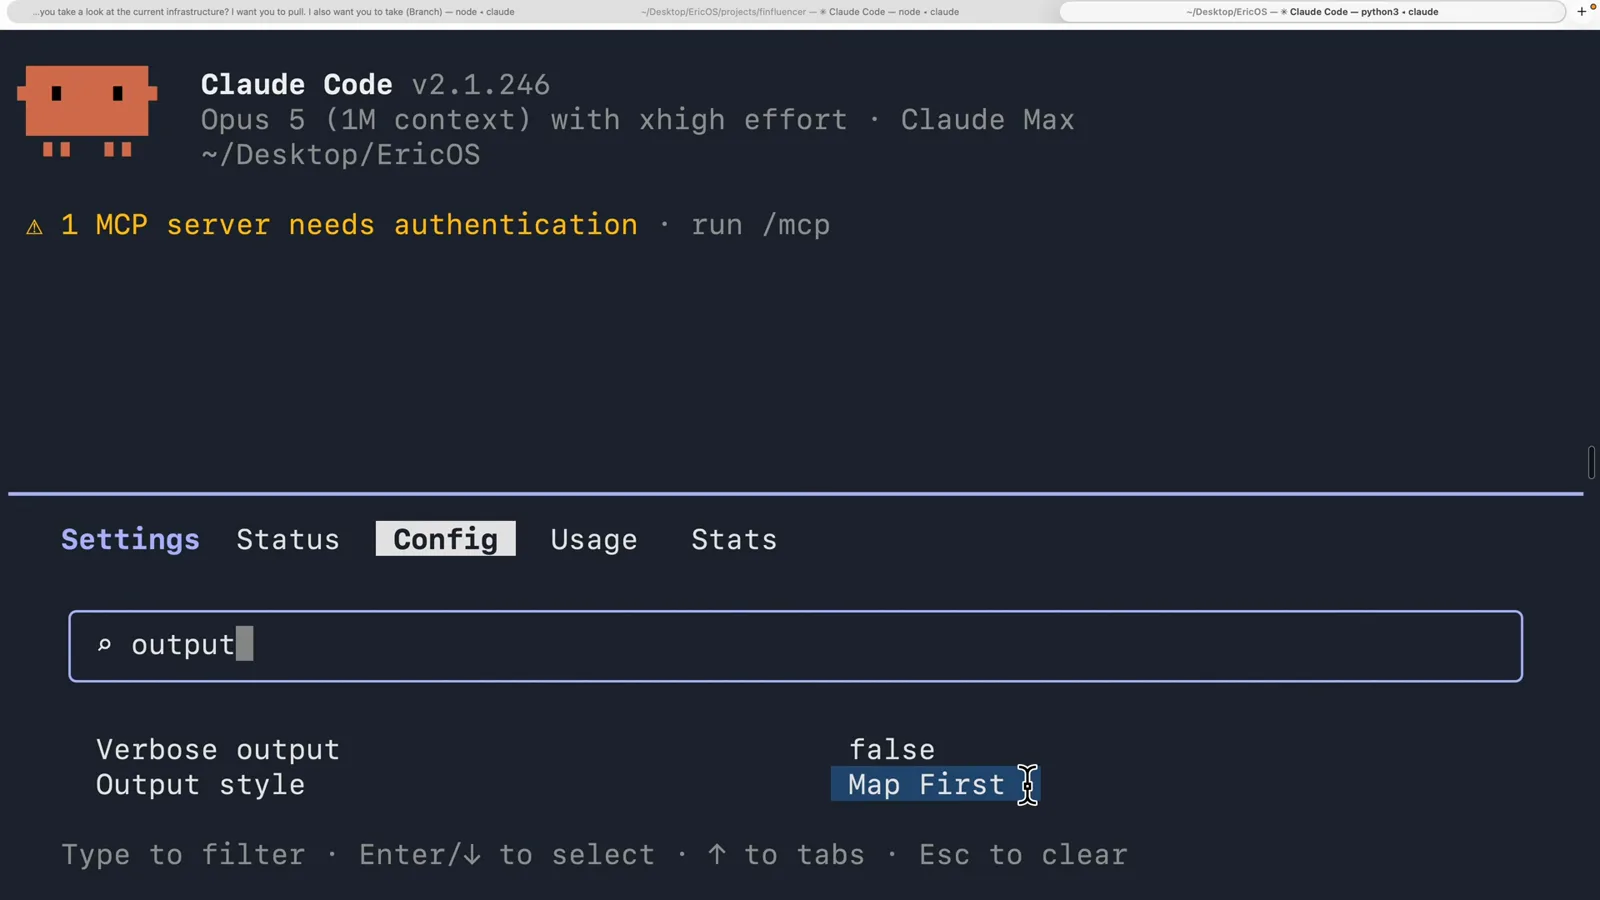
値1つ、プロジェクト1つ、マシン1台。スタイルの共有と設定の共有は別作業、という理由がここにある。動画の 5:54 から見る - 10
1語送って聞き分ける
いちばん安い確認方法は、中身のないメッセージを打つこと。動画ではスタイルを選んだ直後、まっさらなセッション(コンテキストバー 0%、0/1000k、main ブランチ)に 'hi' だけを投げている。1語で違いは聞こえる。ただし動画は回答を画面に残さない。ステータス行が 'Whirlpooling... (1s, 1 tokens)' のまま場面が切り替わり、スタイルを切り替えた後の実際の返信はこの画像には出てこない。空いた部分はドキュメントの2ルールで埋める。セッション途中で切り替えると、有効になるのは次のメッセージから(v2.1.251 以降)。そして端末はスタイルファイル起動時にしか読まないため、稼働中に作ったり直したりしたカスタムスタイルは、再起動するまで一覧に出ない。
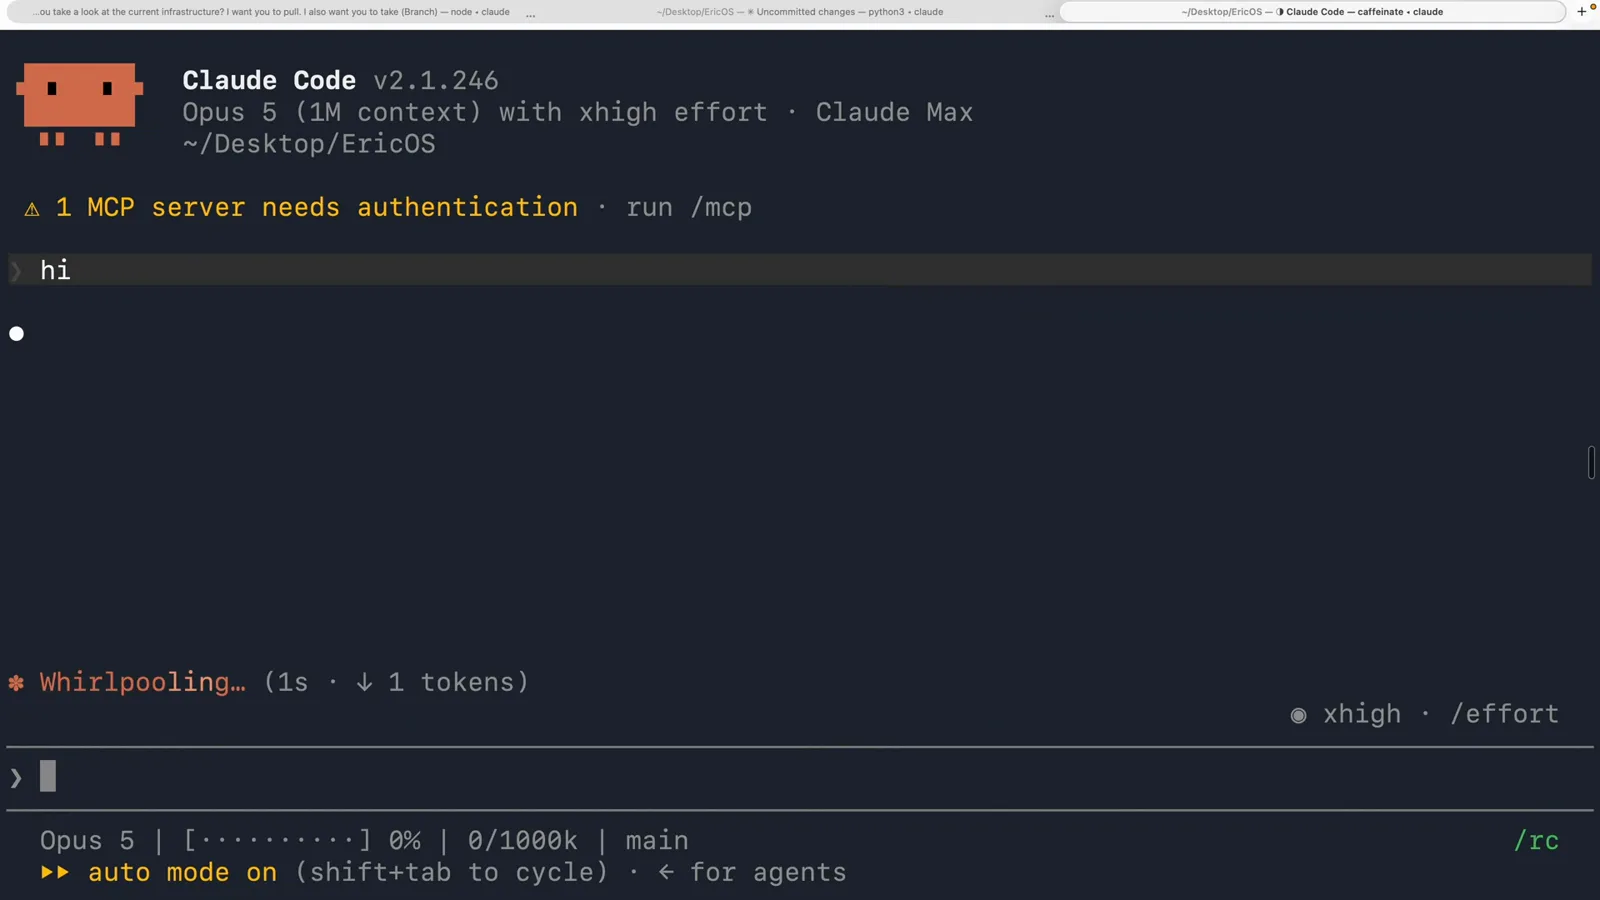
送信は動画の14:00。返信そのものは一度も映らない。動画の 14:00 から見る
1リポジトリ、1人1スタイル
自作する価値が本気出る瞬間はここ。同じ端末の画面でも、読む人によって必要な文はまったく違う。
- 11
タスクではなく読者ごとにスタイルを足す
アウトプットスタイルが「遊び」でなくなるのは、複数人で共有するプロジェクトだ。このリポジトリには組み込み5つに加えてカスタムが3つあり、メニューは順に並んでいる。6. TPM にチェックが入って現在のスタイル——'For a technical project manager or vibe coder who knows API, frontend, backend and database but does not write code. ASD-STE100 cut to a briefing: two vocabulary tiers, every change shipped with its user-visible effect, assumptions stated, one decision as a trade-off with a recommendation.' その真下に 7. Technical Translator が控える。
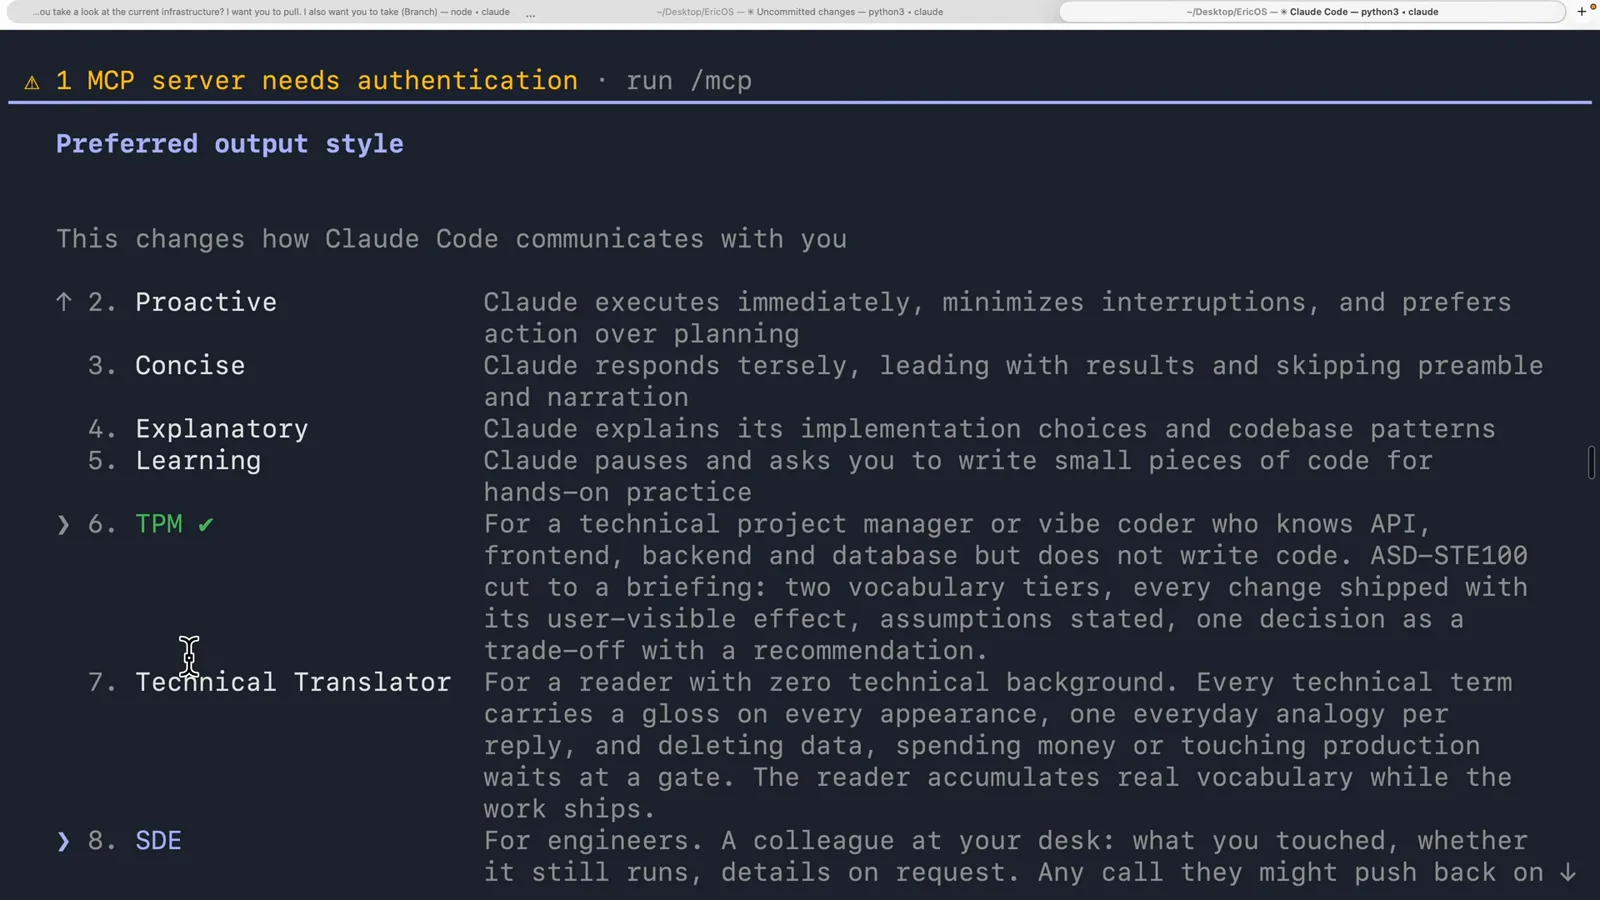
フォルダにファイル3枚。同じコードベースから、メンバーごとに違う Claude を取り出せる。動画の 11:16 から見る - 12
Translator は読者向け、SDE はエンジニア向け
最後の2つの説明文で、この1機能がどれだけ引き伸ばせるかが分かる。7. Technical Translator は 'For a reader with zero technical background. Every technical term carries a gloss on every appearance, one everyday analogy per reply, and deleting data, spending money or touching production waits at a gate.'。8. SDE は 'For engineers. A colleague at your desk: what you touched, whether it still runs, details on request.'。どちらも中身は Markdown の指示文にすぎないが、書かれているのは語域、構成、そしてどこで会話をやめるか——1ターンのプロンプトでは保持しきれない類のものだ。
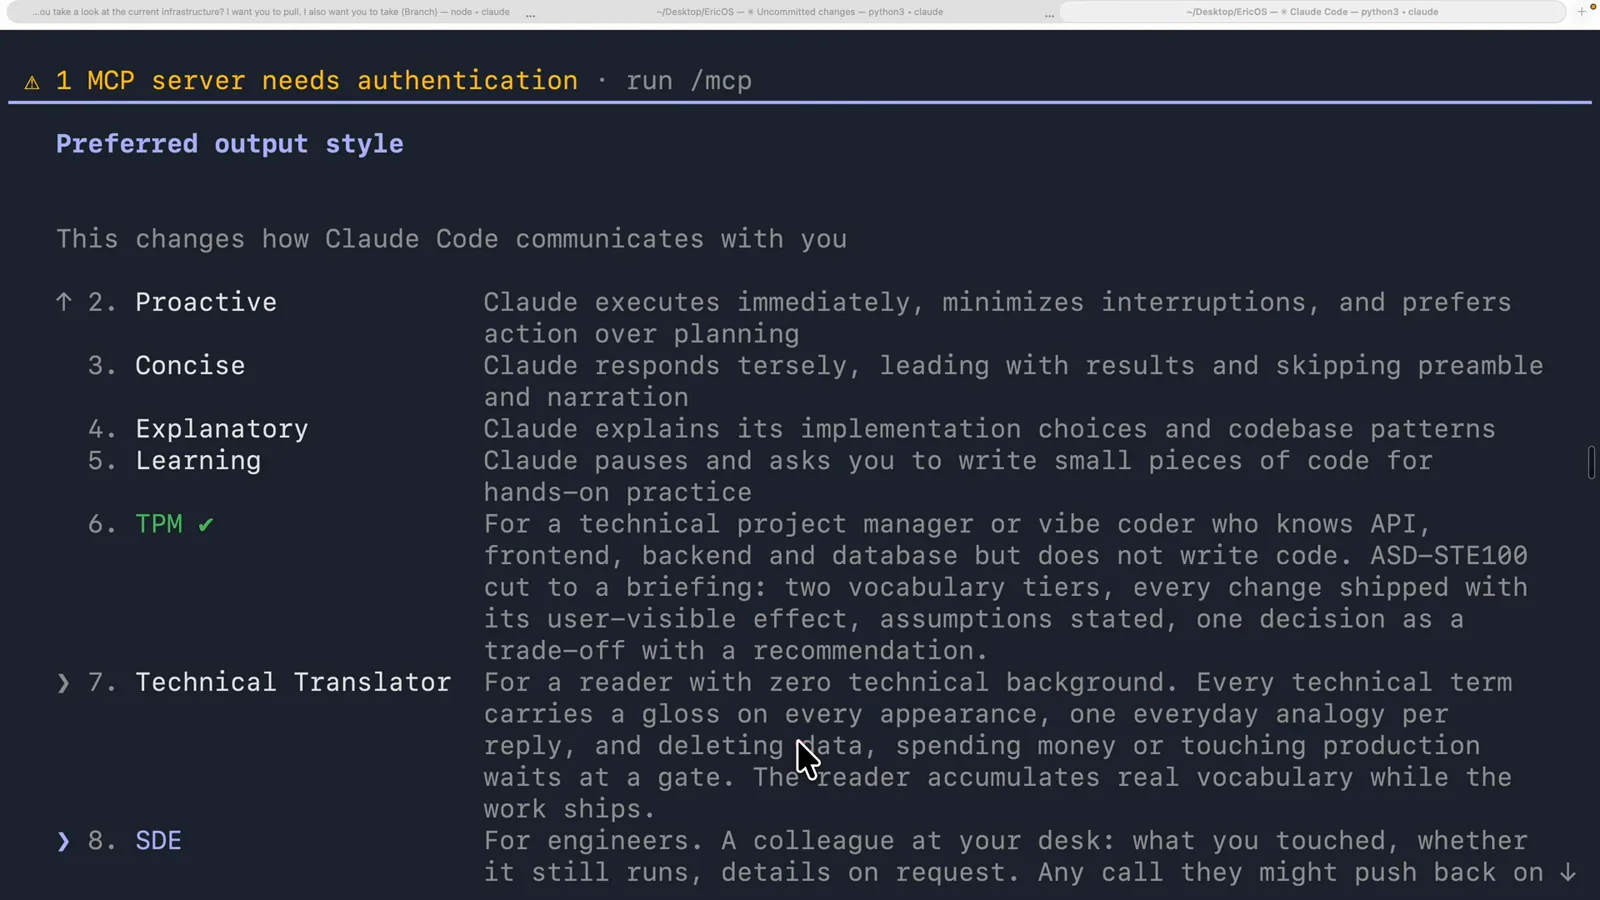
このフレームでマウスが乗っているのは7番目、強調表示の行は 8 SDE。実際に有効なのは上のチェック付き TPM のままだ。動画の 12:28 から見る - 13
値を1つ変えれば、セッションの話し方が変わる
/config に戻してやはり output で絞り込むと、Output style の行は SDE を表示している。チームメイトがやる切り替えはこれで全部。CLAUDE.md を編集せず、最初のメッセージで説明を足し、プロンプトの先頭にペルソナを貼り付ける必要もない。ただしドキュメントの注意は1つ別に読んでおきたい。この機能が誘ういちばん典型的な失敗だからだ。アウトプットスタイルはメインの会話と、その fork(親の会話とシステムプロンプトをそのまま継承するもの)に適用される。一方、他のサブエージェントは各自のシステムプロンプトで動くため、スタイルを変えてもサブエージェントの答え方は変わらない。
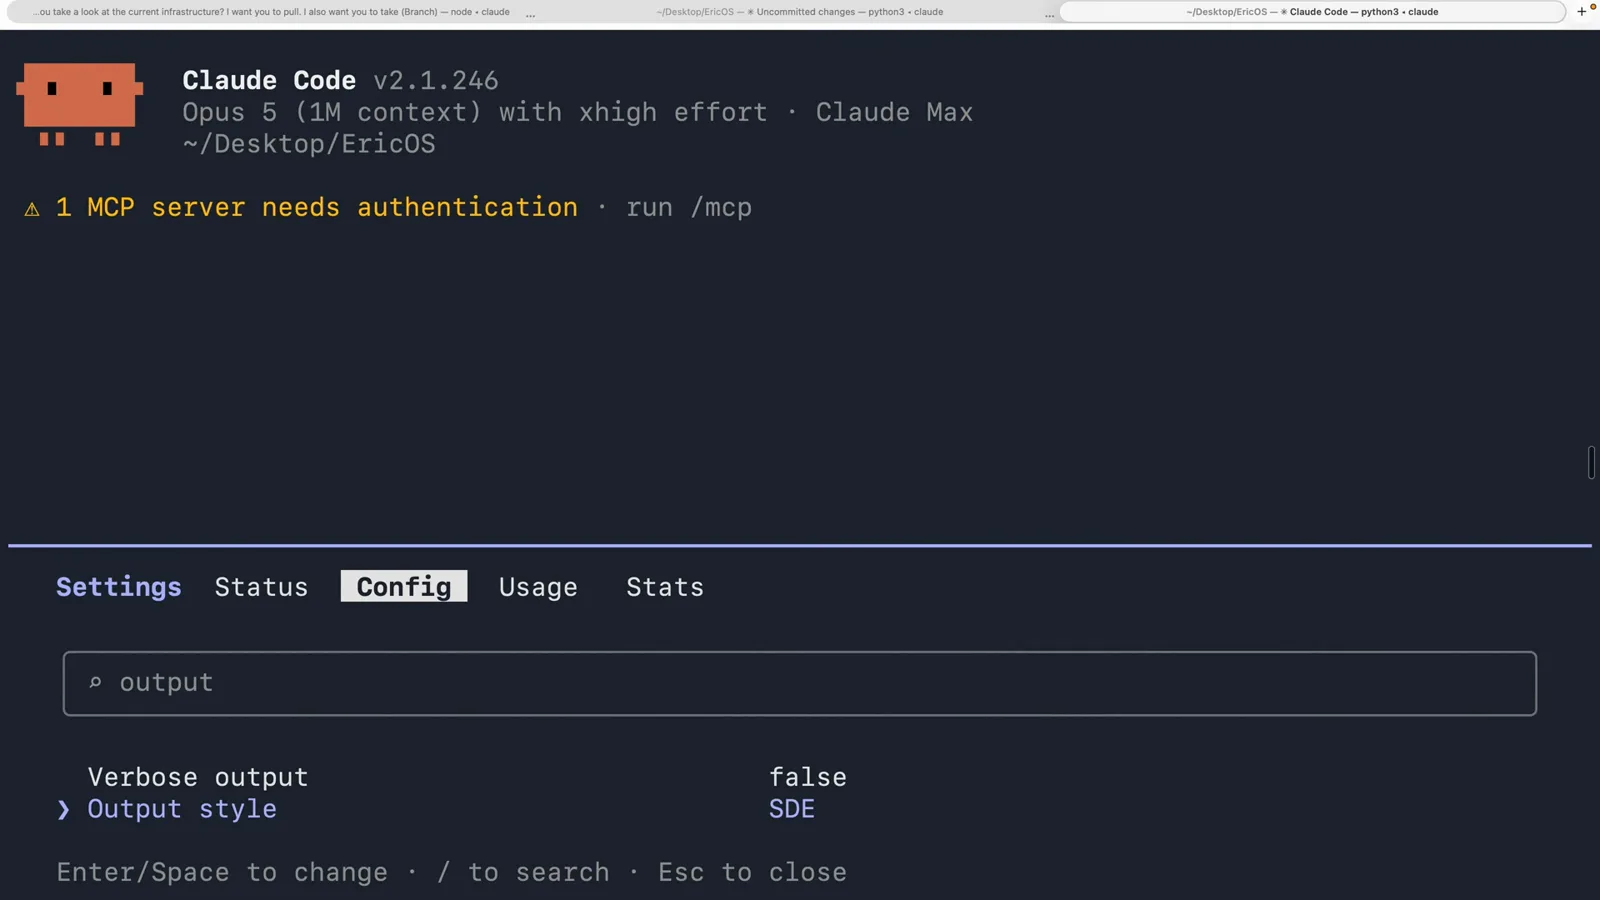
ステップ9と同じ画面で、値だけが違う。この設定項目がそのまま操作画面のすべて。動画の 13:52 から見る