
图文详解
Claude Code 接入 GitHub Actions:用 @claude 自动处理 Issue 与 PR 代码审查
在 Claude Code 里跑一次 /install-github-app,两个工作流文件它替你写好。之后只要在任意 Issue 或 PR 评论里 @claude,Agent 就会作为 GitHub Actions 任务运行:读仓库、改代码、推一个带日期的分支,再由第二个工作流在你合并之前把 diff 审一遍。
共 16 步图文教程,读完约 6 分钟。每一步都能跳回源视频里对应的画面。
太长不看
先装好 GitHub CLI 并 gh auth login 登录,然后在 Claude Code 里执行 /install-github-app。它会问你配置哪个仓库,打开 github.com/apps/claude 让你授权,接着让你勾选两个工作流——@Claude Code 负责响应 Issue 和 PR 评论里的 @claude,Claude Code Review 负责审查每一个新建的 PR——最后再选一条路:用 Claude 订阅生成一个长期 token,或者填自己的 API Key。整个安装不会直接往 main 提交,而是开一个包含工作流文件的 PR,PR 描述里就写着 allowed_tools 那行——想让它跑 npm 命令就在这儿加。合并之后,在 Issue 里 @claude 一句,机器人会在原楼回复一份待办清单,在 claude/issue-<编号>-<时间戳> 分支上改代码,写完贴一个 Create PR 链接。你一开 PR,审查工作流就被触发,逐条给这份 diff 打分,然后才轮到合并。
源视频
本页跟着 Net Ninja 的这段演示走了一遍:安装 Claude GitHub App,再用一条普通的 bug 反馈驱动它干活,逐张截图重做。每张图都能跳回视频里出现的那一秒。
截图取自源视频并署名原作者,文字为本站原创。步骤已对照视频与 Claude Code 官方文档核验(2026 年 9 月)。
动手之前
安装是在 Claude Code 会话里发起的,但它操作 GitHub 靠的是 GitHub CLI,所以 CLI 必须先装好、先登录。
- 1
先装 GitHub CLI 并登录
Claude GitHub App 是从 Claude Code 内部发起安装的,但它对 GitHub 的每一步操作都走 GitHub CLI。视频里打开的就是 cli.github.com 的手册页:macOS 用 Homebrew、Windows 用 winget 装 gh,然后 gh auth login 登录接下来要承接这次安装的账号。视频把这一步当成开工前唯一的前置条件。
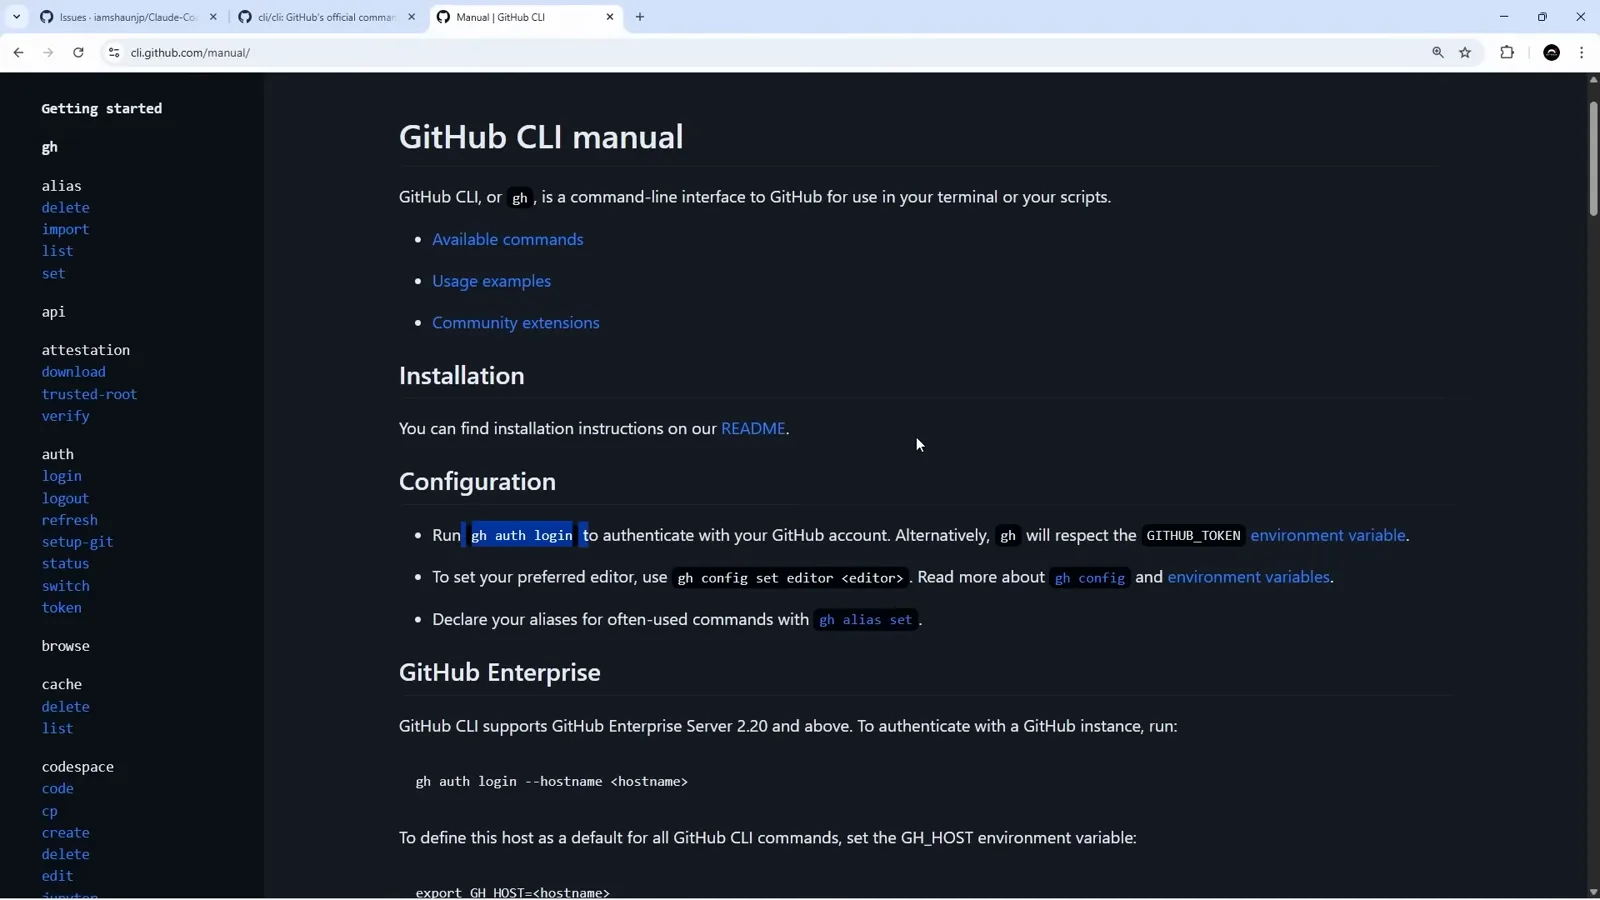
一条 gh auth login,后面整个安装流程才找得到你的账号。看 1:06 处的画面 - 2
在要接入的项目里执行 /install-github-app
在目标仓库中打开 Claude Code——视频里它跑在 Visual Studio Code 的面板中,会话顶部打印着当前工作目录——然后开始敲 /install-github。内置命令列表会补出 /install-github-app,屏幕上它的说明写着 "Set up Claude GitHub Actions for a repository"。这一步不用记命令名,补全会替你做。
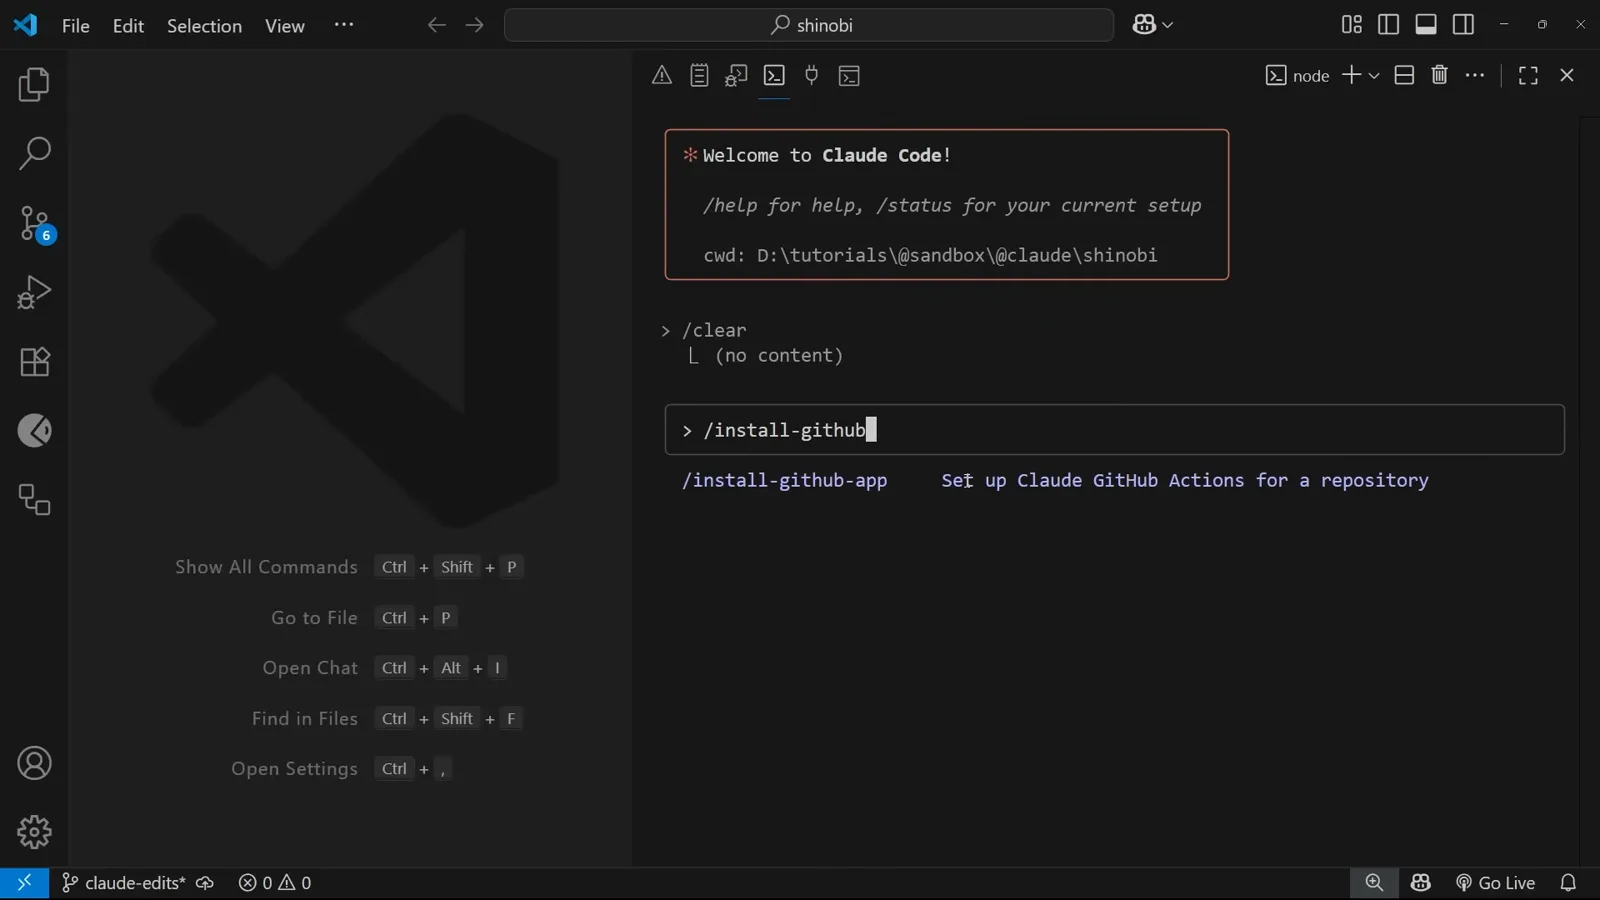
它是内置斜杠命令,不需要提前往 .claude 里加任何东西。看 1:18 处的画面 - 3
选定要装工作流的那个仓库
第一个提示是 "Install GitHub App / Select GitHub repository"。Claude Code 会给出 "Use current repository",后面是当前目录对应的远端——这里是 iamshaunjp/Claude-Code-Tutorial——另一项 "Enter a different repository" 可以填 owner/repo 或完整的 github.com 地址。上下键移动光标,回车继续。
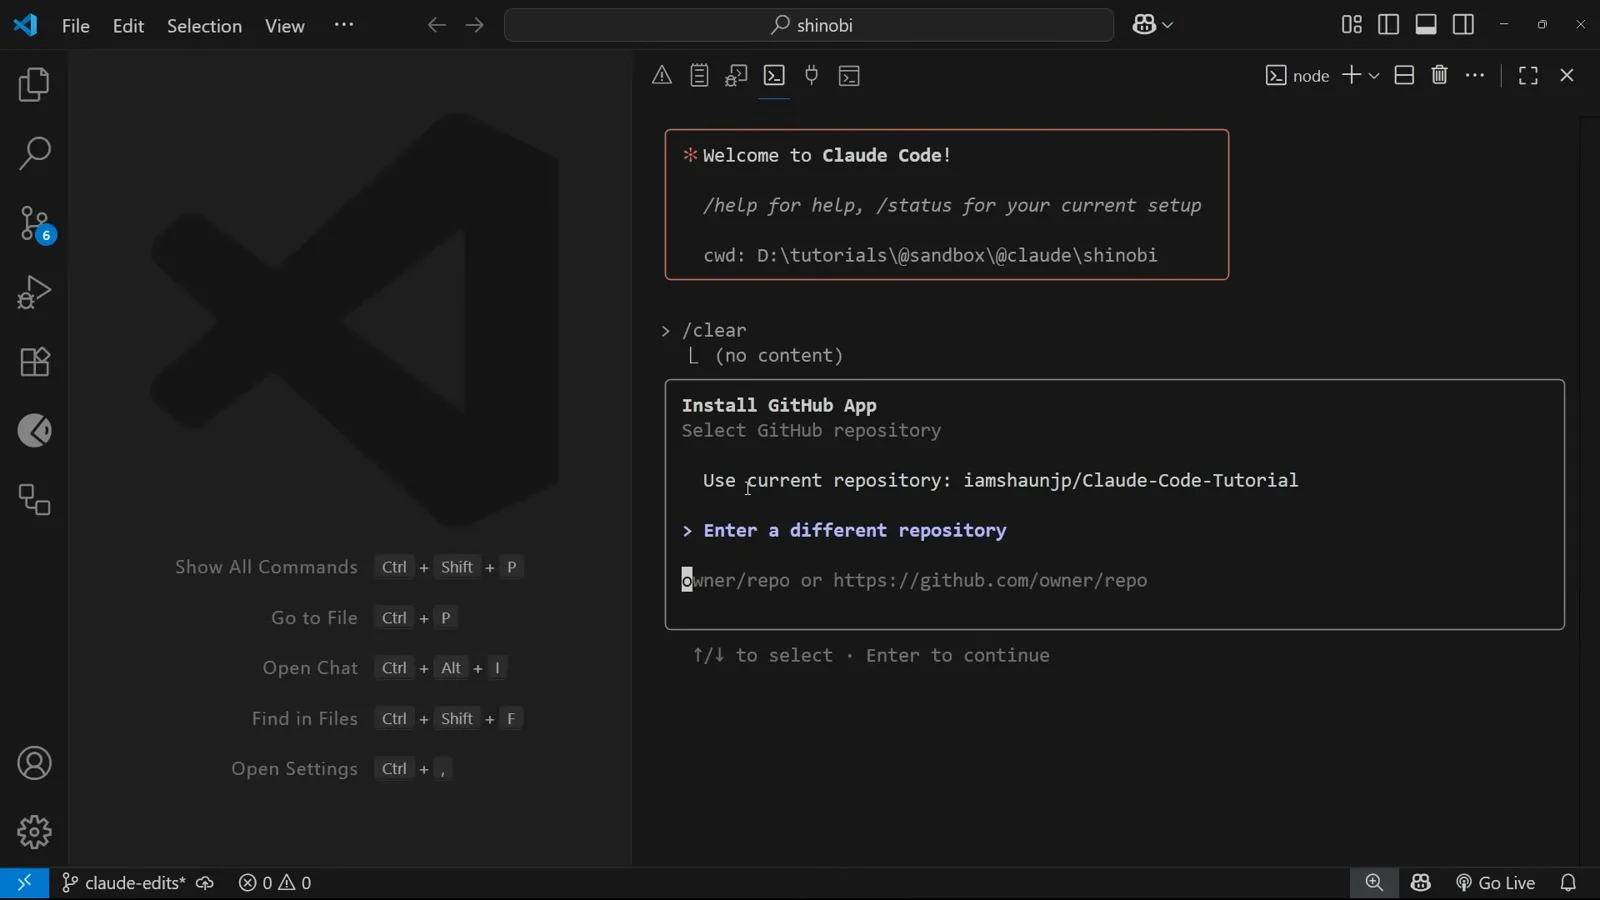
仓库是在这一刻定下的,不是之后——紧接着的 App 授权就只针对它。看 1:30 处的画面
在 GitHub 上给 Claude 授权
连着四个选择,决定了这个 Agent 能碰到你账号里的多少东西:哪些仓库、哪些权限、装哪几个工作流、以及花谁的钱。
- 4
浏览器会打开 Claude GitHub App 的详情页
终端把页面交给 github.com/apps/claude。这个 App 挂在 anthropics 组织下,介绍里写的是让 Claude Code 从你的 Pull Request 和 Issue 中运行,用来回应 reviewer 反馈、修 CI 报错或者改代码,并说明它构建在公开的 Claude Code SDK 之上。整页只有一个 Install 按钮。
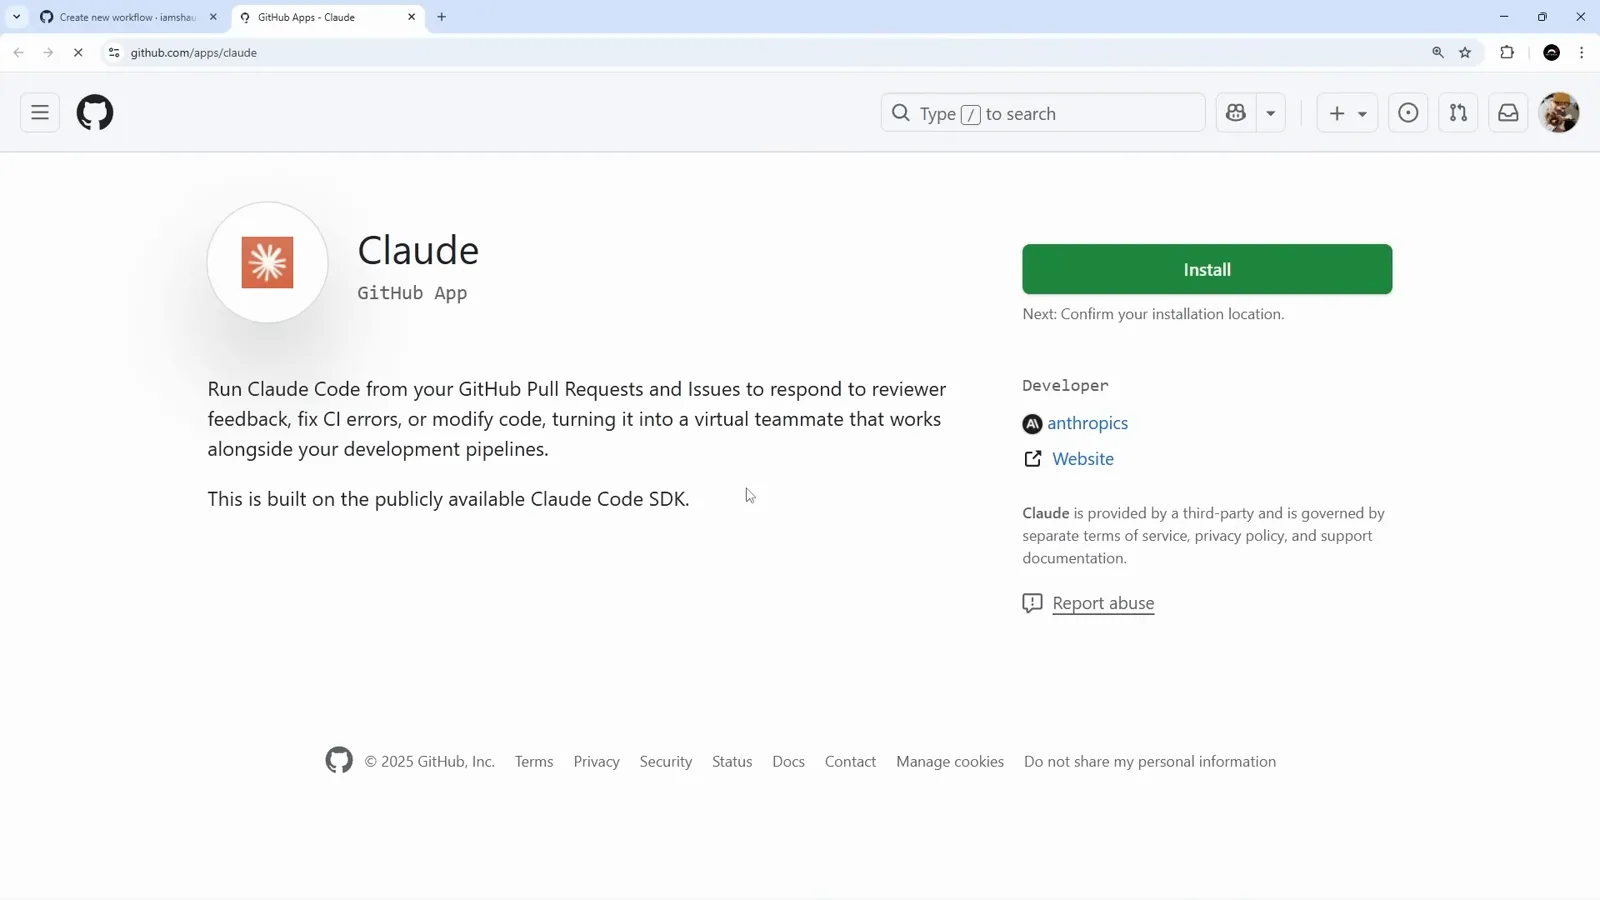
这页值得读一遍:"fix CI errors" 是官方写明的用法,不是野路子。看 1:38 处的画面 - 5
先划仓库范围,再逐条看权限
"Install & Authorize" 提供 All repositories 和 Only select repositories 两个选项,选后者就把 Agent 挡在账号下其他仓库之外。下面 GitHub 会把它要的东西摊开写:Read access to metadata,以及 Read and write access to code, issues, and pull requests。正是这个写权限让 Claude 之后能推分支、开 PR,所以这里该想清楚再点,而不是顺手确认。页面底部写着下一步会跳转到 claude.ai/connect/github/callback。
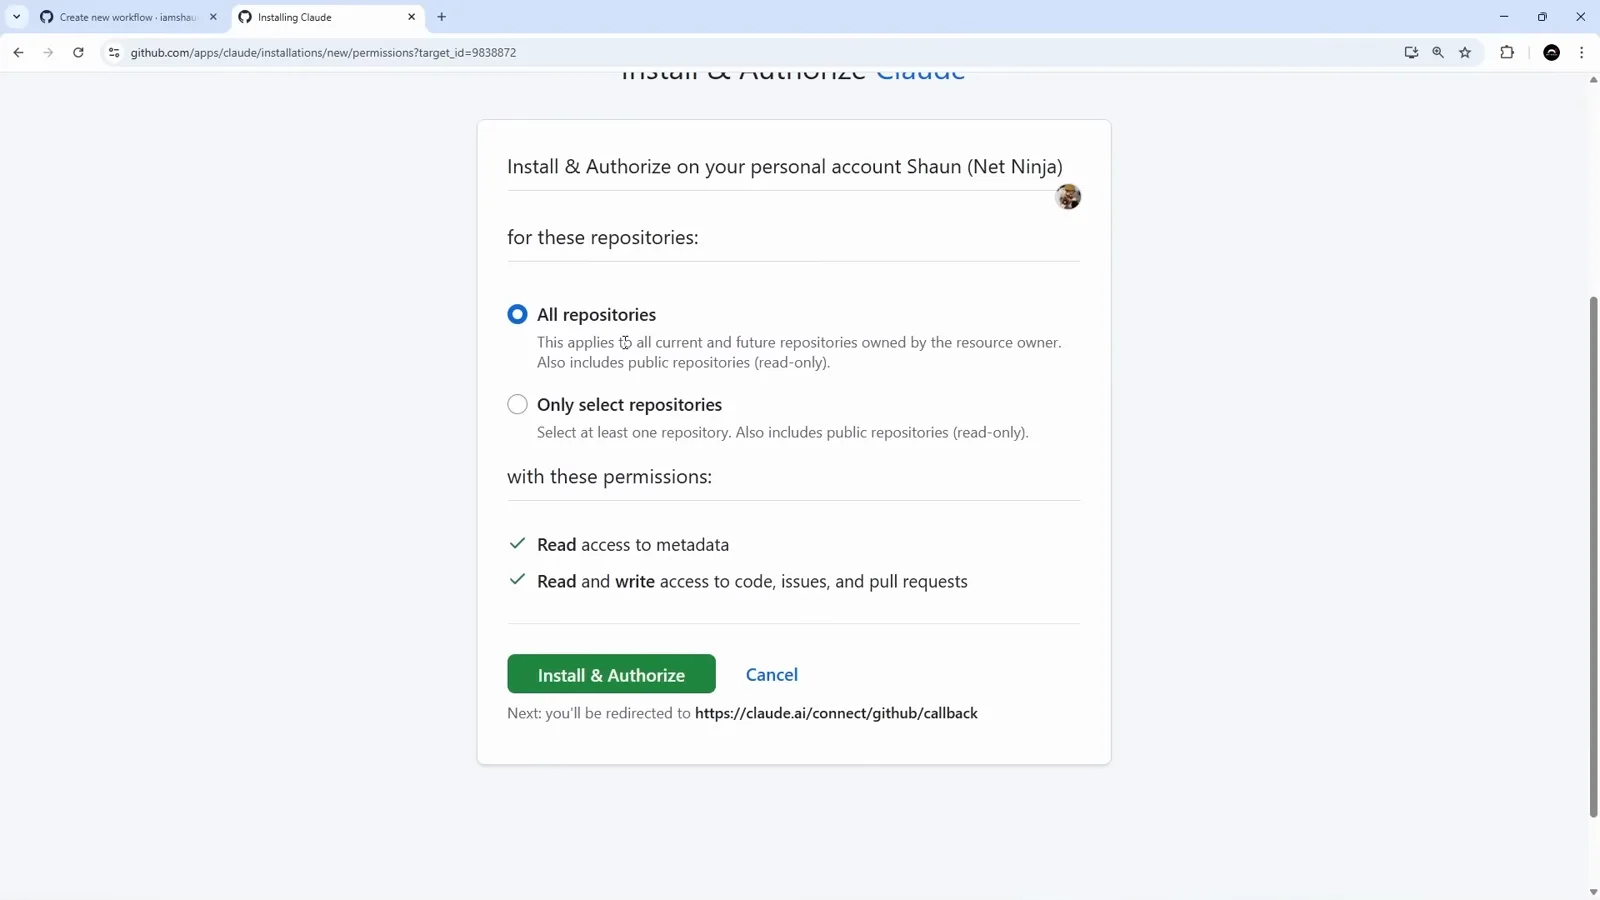
选 Only select repositories,是拿它做演示和真跑在生产仓库里的分水岭。看 1:50 处的画面 - 6
勾上你要的那两个工作流
回到 Claude Code:"Select GitHub workflows to install - we'll create a workflow file in your repository for each one you select." 列表里两项,视频里都已勾上。@Claude Code 是干活的那个,副标题写着 "Tag @claude in issues and PR comments";Claude Code Review 是审查的那个,副标题写着 "Automated code review on new PRs"。空格切换勾选,回车确认。
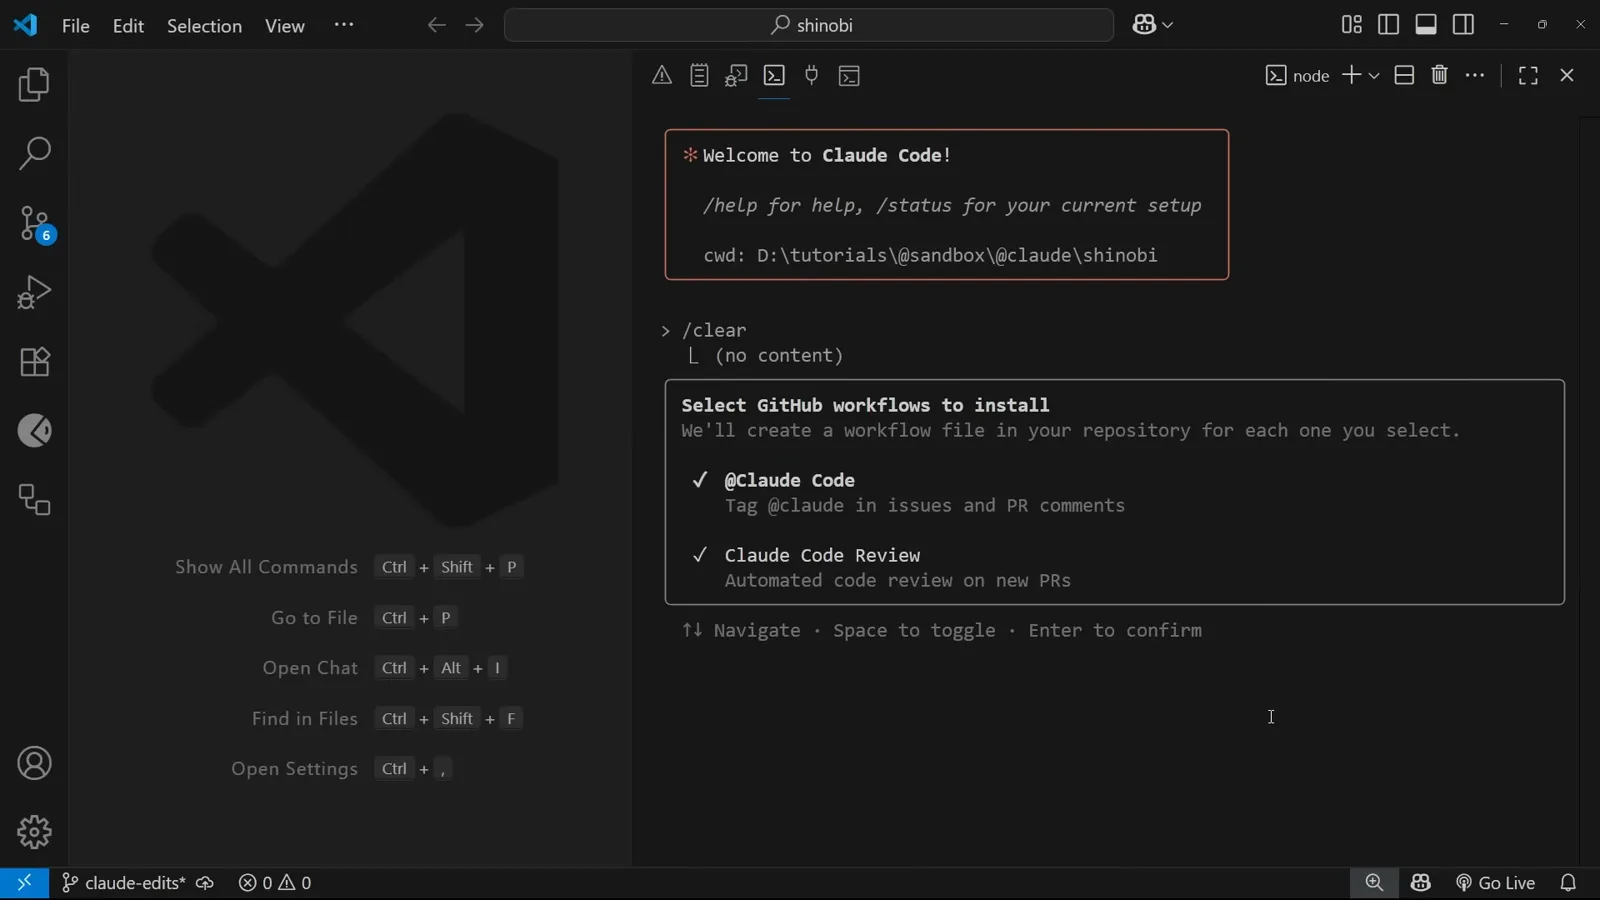
这一屏之后会生成两个独立的工作流文件——一个动手,一个把关。看 2:10 处的画面 - 7
决定这个工作流走谁的账
"Choose API key" 这一步最容易被跳过。"Create a long-lived token with your Claude subscription" 会把工作流绑到你的 Claude 订阅上,随后浏览器里的授权页写得很直白:你的账号将用于抵扣 Claude 订阅用量。选 "Enter a new API key" 则改成填 Anthropic API Key,按 token 计费。不管走哪条,凭据最终都以 GitHub Actions secret 存放——后面那个自动生成的 PR 里会明确写出来。
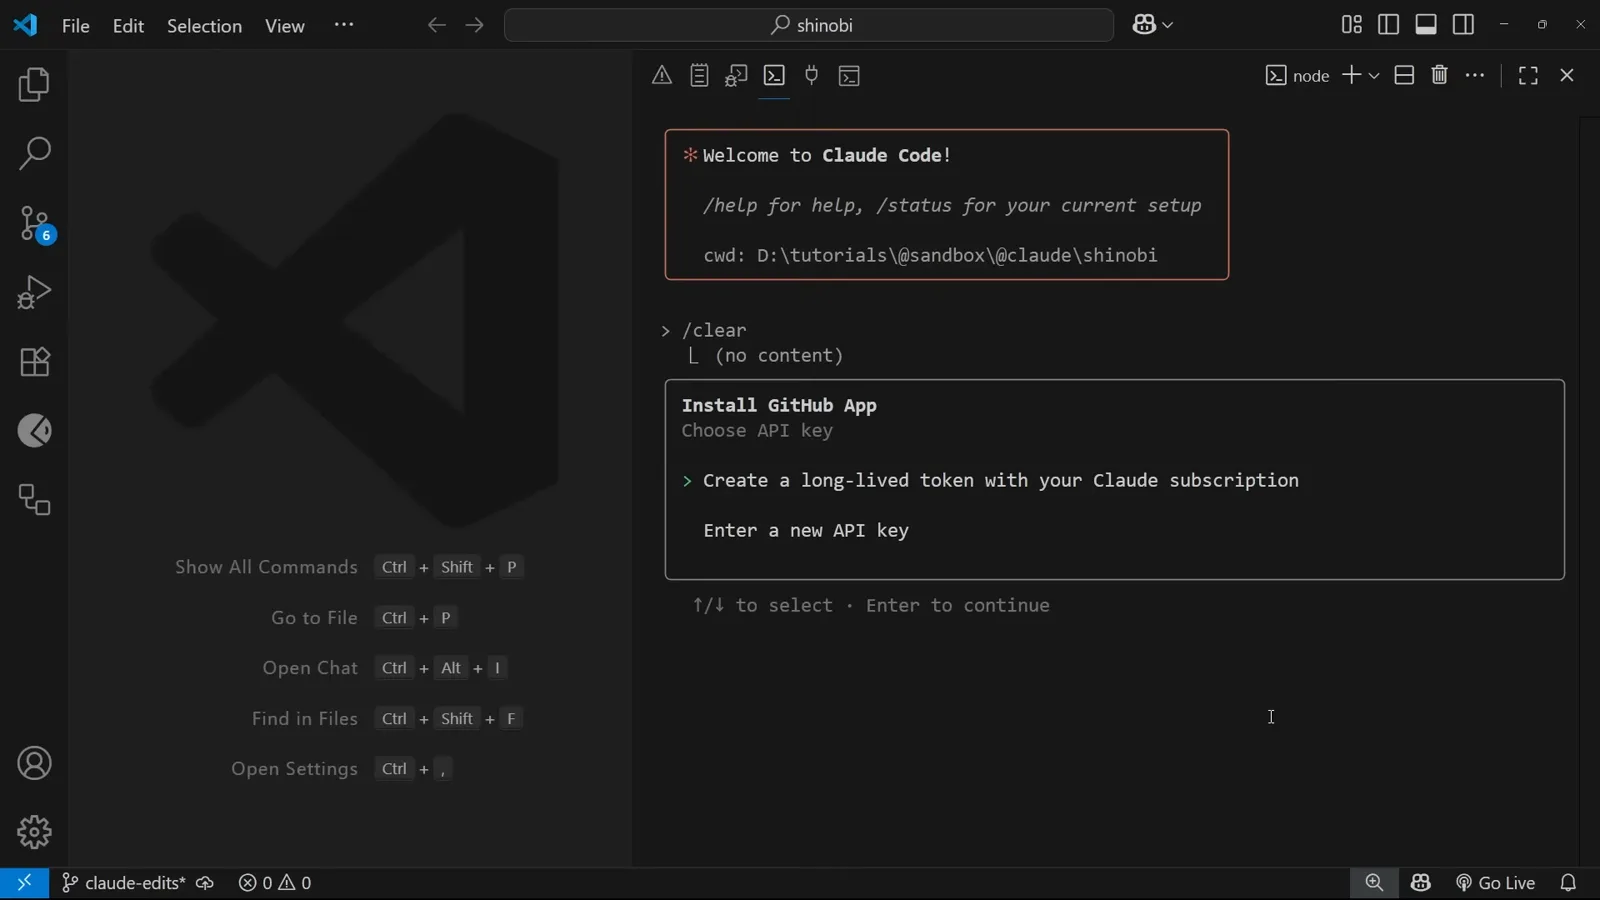
订阅额度还是按量计费,只在这一次选择里定,之后基本不会再想起。看 2:16 处的画面
那个工作流 PR
/install-github-app 从不直接往默认分支写。它开一个装着工作流文件的 PR,而这个 PR 的描述本身就是这个功能最好的文档。
- 8
安装结果是 PR,不是提交
Claude Code 把工作流文件写到一个新分支上,分支名是 add-claude-github-actions 加一长串时间戳,然后打开 GitHub 的 compare 页面并预先填好:base 是 main,compare 是新分支,标题 "Add Claude Code GitHub Workflow",描述整段自动生成。在你亲自合并之前,默认分支不会有任何变化。
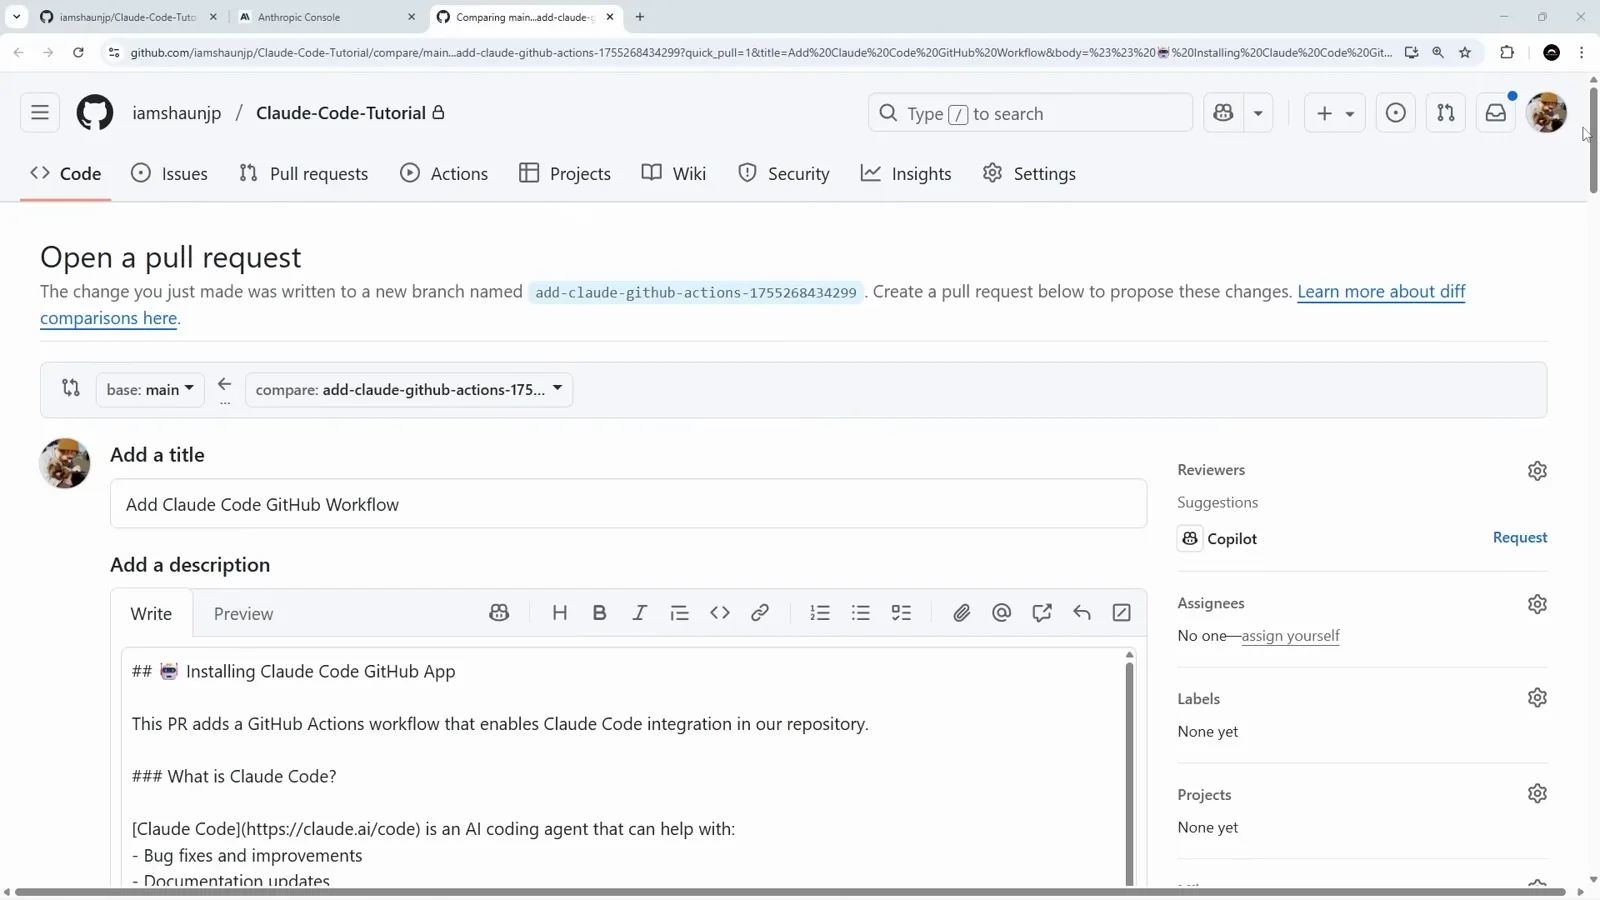
看那个自动生成的分支名就知道——安装器把自己当成一个普通贡献者。看 2:28 处的画面 - 9
认真读 Security 清单和 allowed_tools 那行
这段自动生成的描述,是这个功能最好的说明书。它写着:这个 PR 合并之前 @claude 提及不会生效;只要 PR 或 Issue 评论里提到 Claude,工作流就会运行;Claude 能拿到整条评论及其上下文,包括文件、diff 和历史评论。Security 部分接着写:API Key 以 GitHub Actions secret 保存;只有对仓库有写权限的用户能触发;每次运行都会留在 Actions 历史里;Claude 的默认工具被限制为读写文件,以及创建评论、分支和提交。再往下一行就是放开口子的地方——allowed_tools: Bash(npm install),Bash(npm run build),Bash(npm run …,后面那几项被视口截断在画面外。
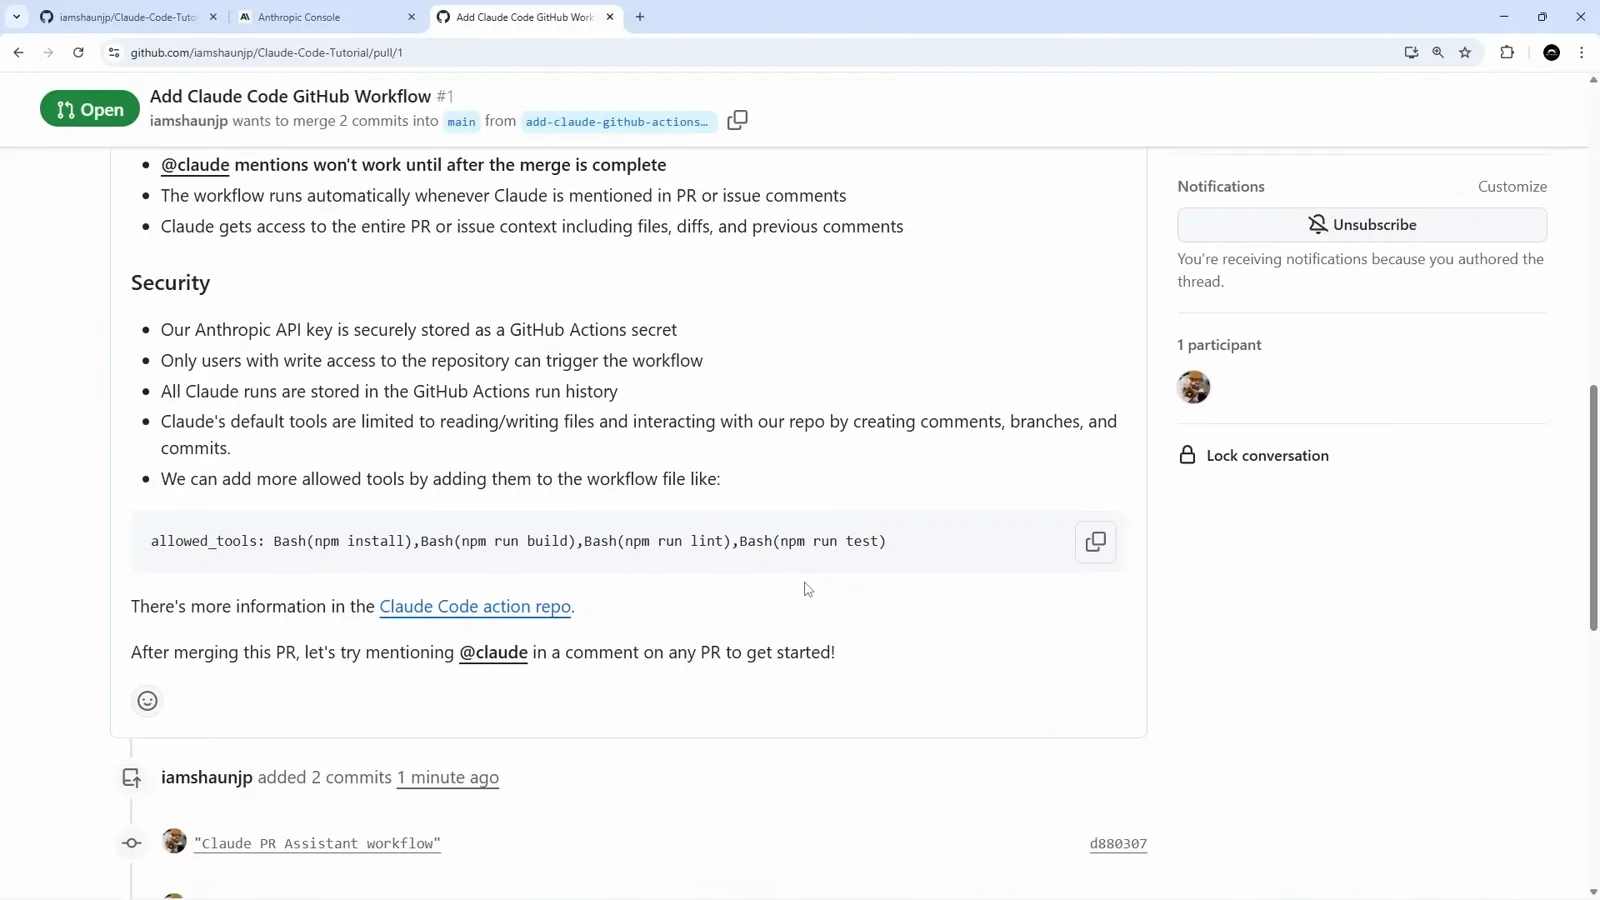
这屏最该截图收藏:默认边界和改边界的确切写法都在上面。看 2:42 处的画面 - 10
审查器先审了自己的安装
这个 PR 带两个提交,分别是 "claude PR Assistant workflow" 和 "claude Code Review workflow"。因为审查器的工作流文件已经进了代码树,GitHub 会报 "Some checks haven't completed yet",claude-review (pull_request) 已经开跑——安装审查器的那个 PR 本身正在被审查。下面一行是 "No conflicts with base branch",所以合不合完全由你决定。
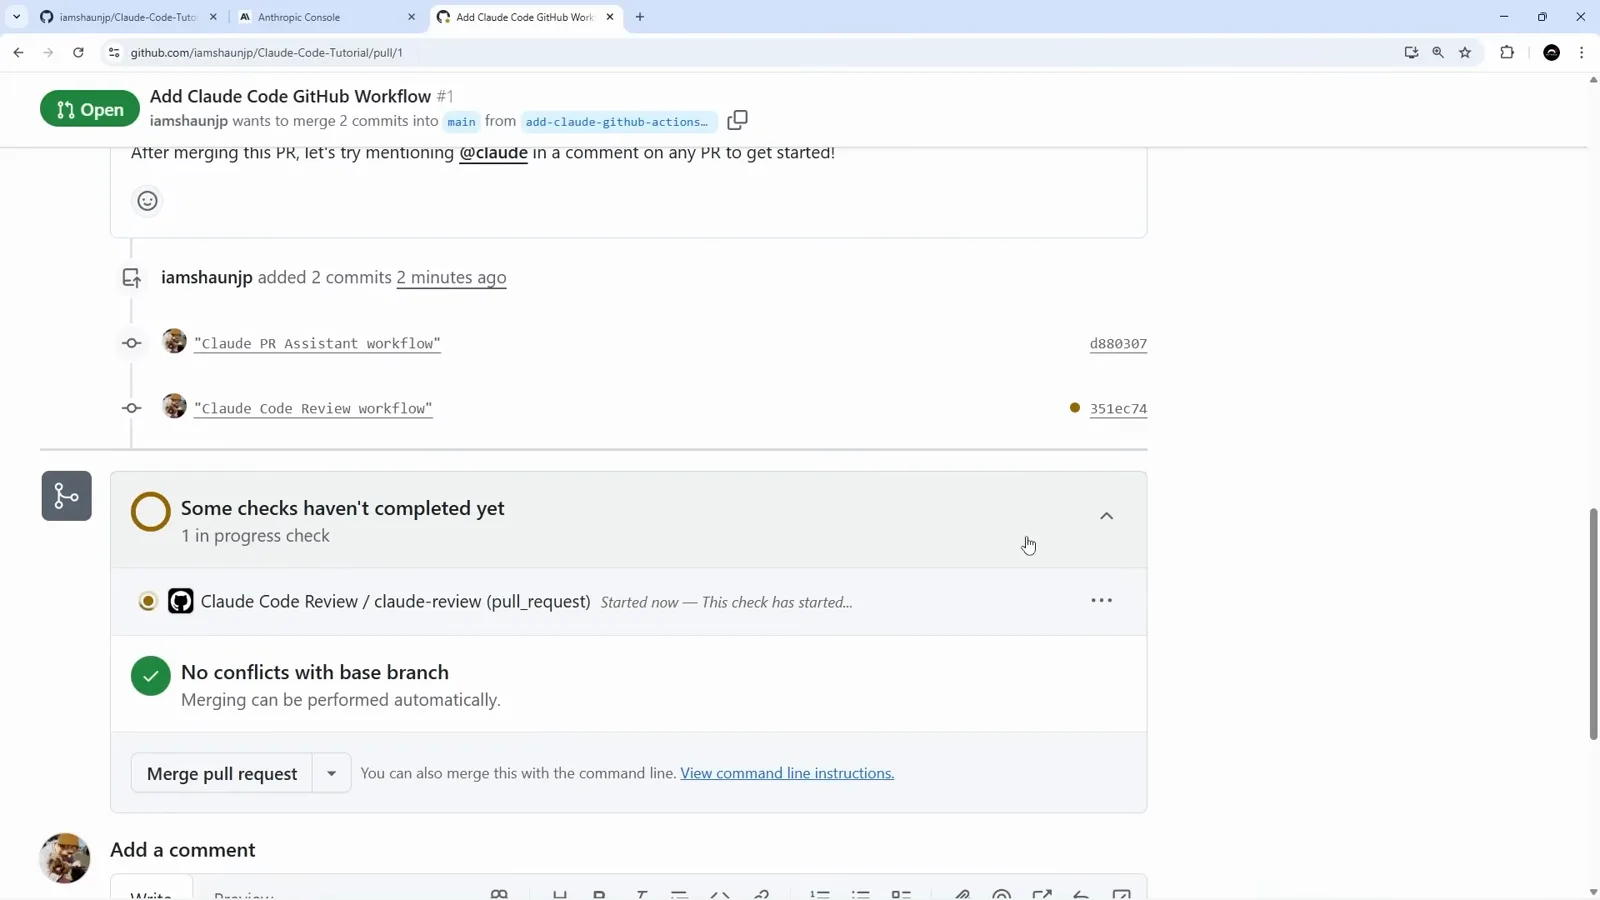
装审查器的工作流会被它审一遍。这是个好性质,不是 bug。看 2:46 处的画面
从一条 Issue 到一条分支
@claude 提及就是扳机。之后的所有事都发生在 GitHub 那边,不在你的电脑上。
- 11
像给同事提 bug 那样写这条 Issue
演示仓库是一个小型 Next.js 博客。这条 Issue 故意写得很朴素:标题 "Link from title missing",正文 "There is no link from the title (in navbar) to the homepage." 没有标签、没有指派人、没有指向某个文件,也没提示怎么改。给出去的就是这一句话。
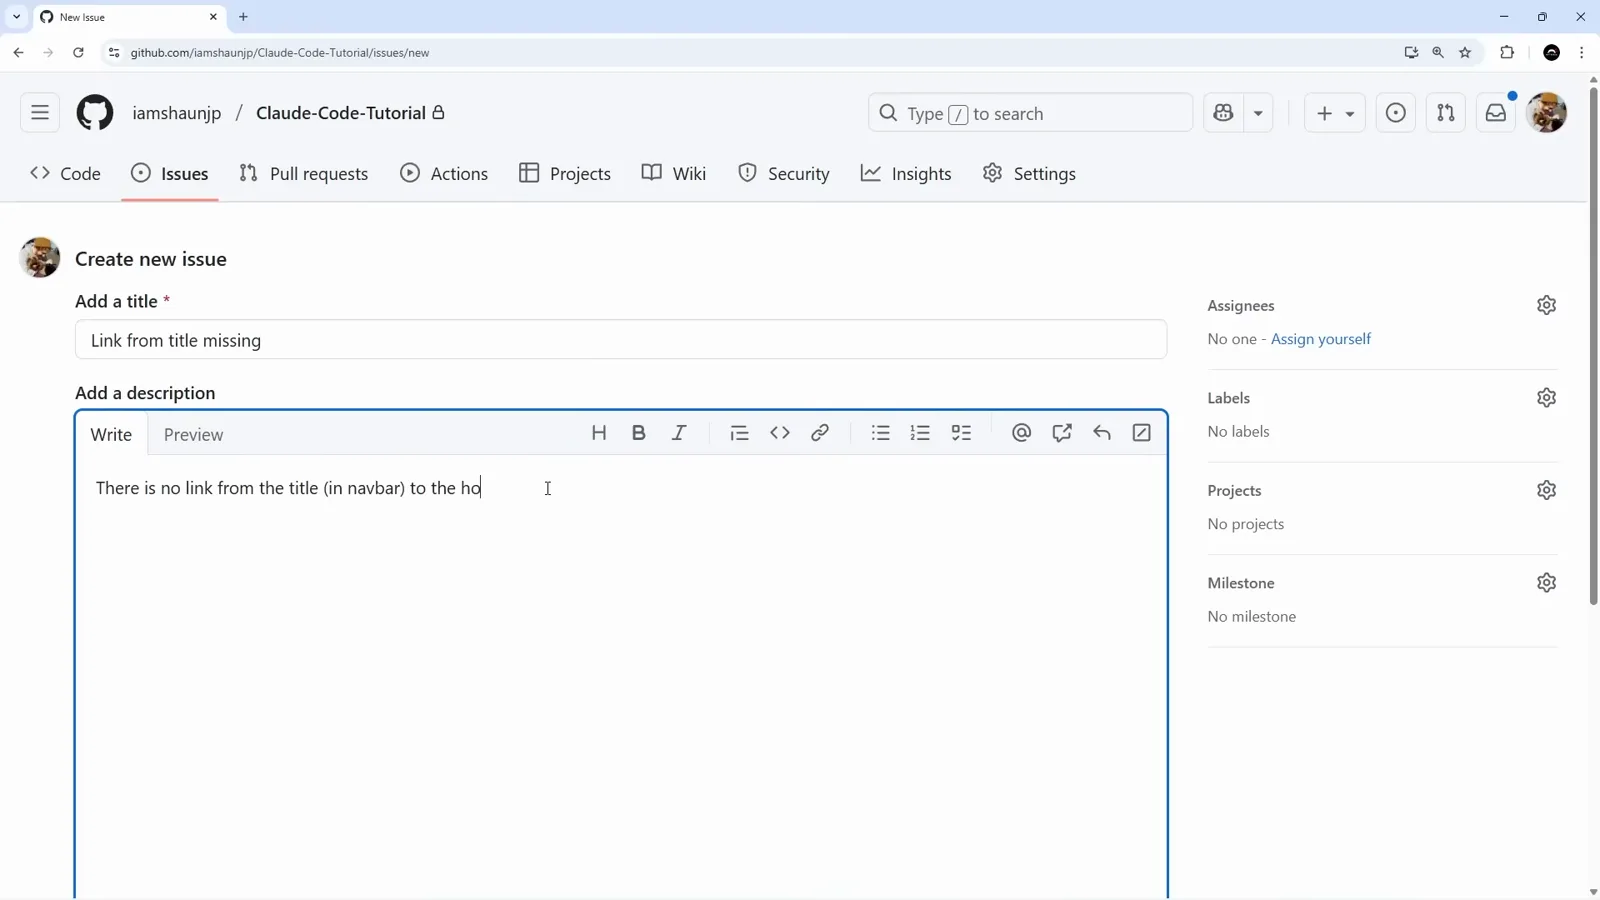
这里没有任何提示词技巧——它就是一条设计师也会提的普通 bug。看 3:34 处的画面 - 12
@claude 一提,Agent 就接住了
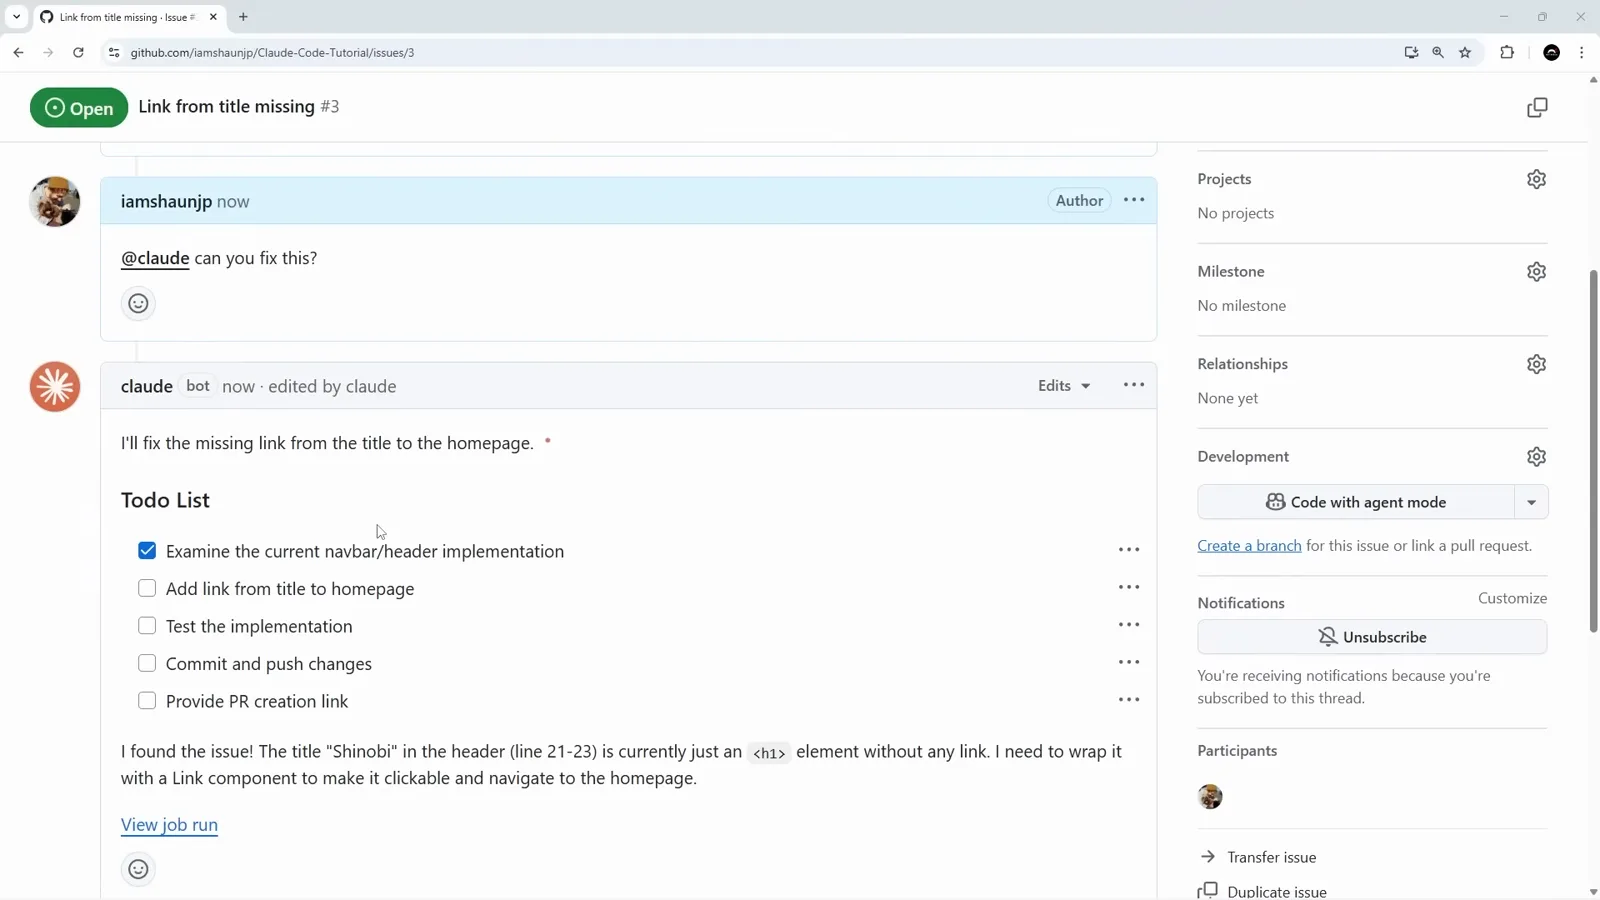
只建 Issue 什么都不会发生。扳机是一条评论:"@claude can you fix this?"。机器人在同一个楼层回复——"I'll fix the missing link from the title to the homepage"——并附上一份五项的 Todo List:检查当前 navbar/header 实现、给标题加首页链接、测试实现、提交并推送、提供创建 PR 的链接。下面就是它真正查到的东西:header 里的 "Shinobi" 标题只是一个没有链接的 <h1>。随着逐项打勾,这条评论会被原地编辑,底部的 View job run 直接指向干活的 Actions 任务。
待办清单是一条会被编辑的评论,不用点进任务也能看到进度。看 4:06 处的画面 - 13
它在开 PR 前一步停下
清单跑完后,机器人评论的抬头会变成 "Claude finished" 加上提出人的 ID,并给出三个链接:View job、分支 claude/issue-3-20250815-1450、以及 Create PR。分支名里同时带着 Issue 编号和日期时间戳,这正是同一个仓库里并行修多个问题时还能看得清的关键。点 Create PR,GitHub 的建 PR 表单已经替你把标题和描述填好。
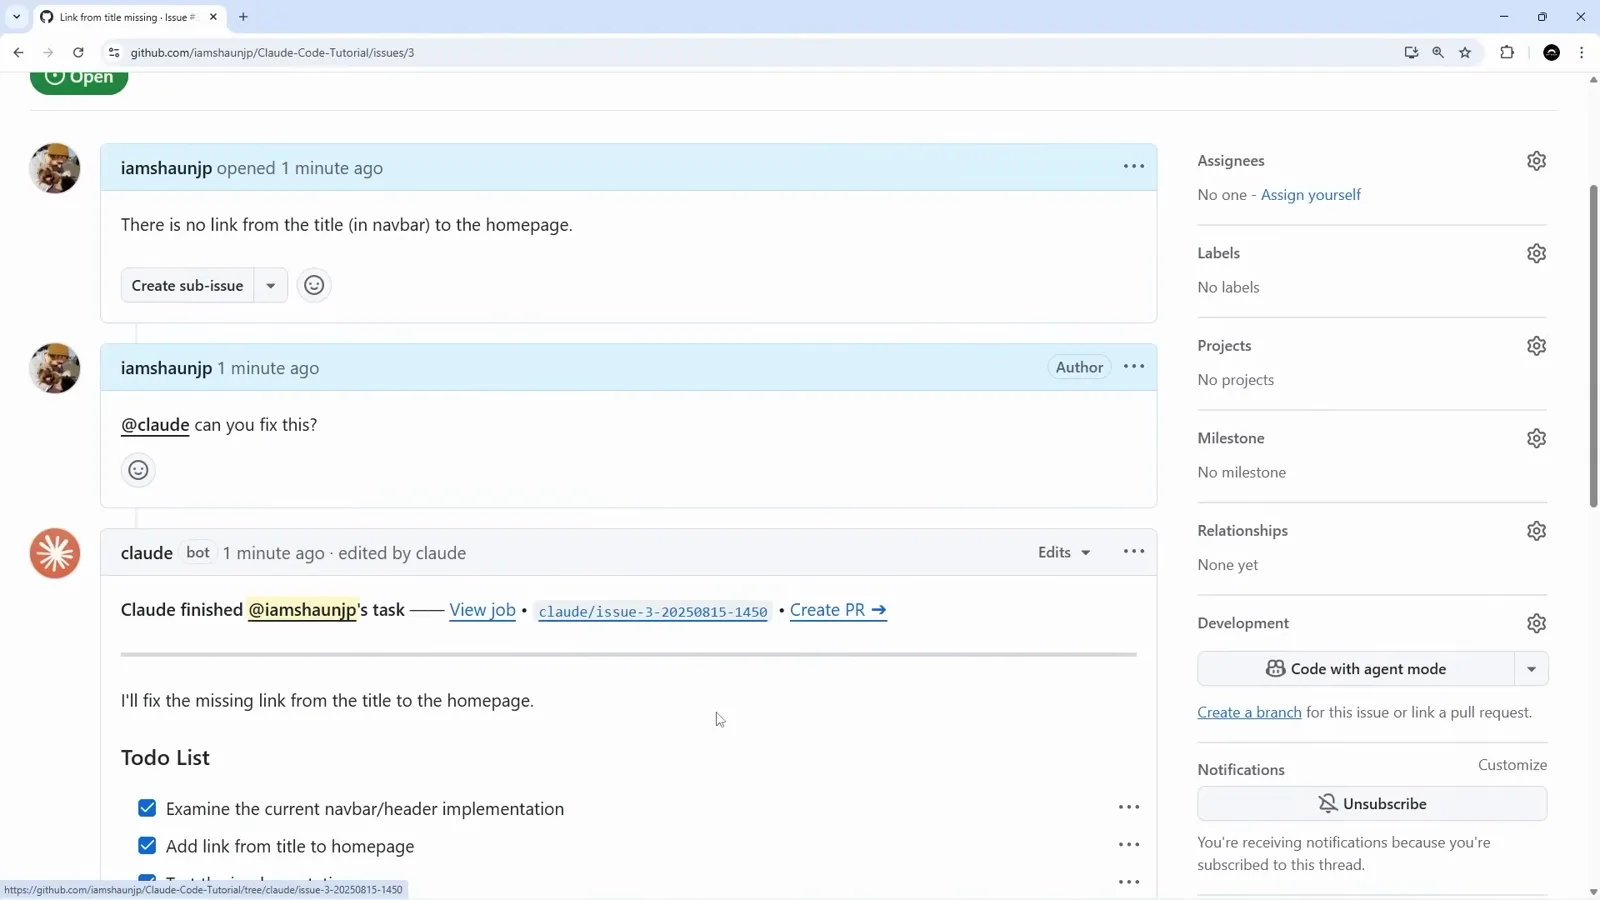
它把需要人拍板的那一步,留在了成本最低的一次点击上。看 4:30 处的画面
审查、合并、复盘
第二个工作流负责读 Claude 刚写出来的 diff 并给出结论,Actions 页面则告诉你这一圈到底花了多少。
- 14
第二个工作流开始给 diff 打分
PR 一建好,Claude Code Review 就被触发。它的评论是结构化的:先给总体结论,然后是分节打勾的 Code Quality & Best Practices、No Bugs or Issues Found、Performance Considerations 和 Security。结论是直接引 diff 的,不是泛泛而谈——从 next/link 引入的 Link 组件、hover:text-accent transition-colors 这两个类、href="/" 指向哪里,以及 h1 被保留在链接内部所以标题层级没有被打乱,都逐条点名。
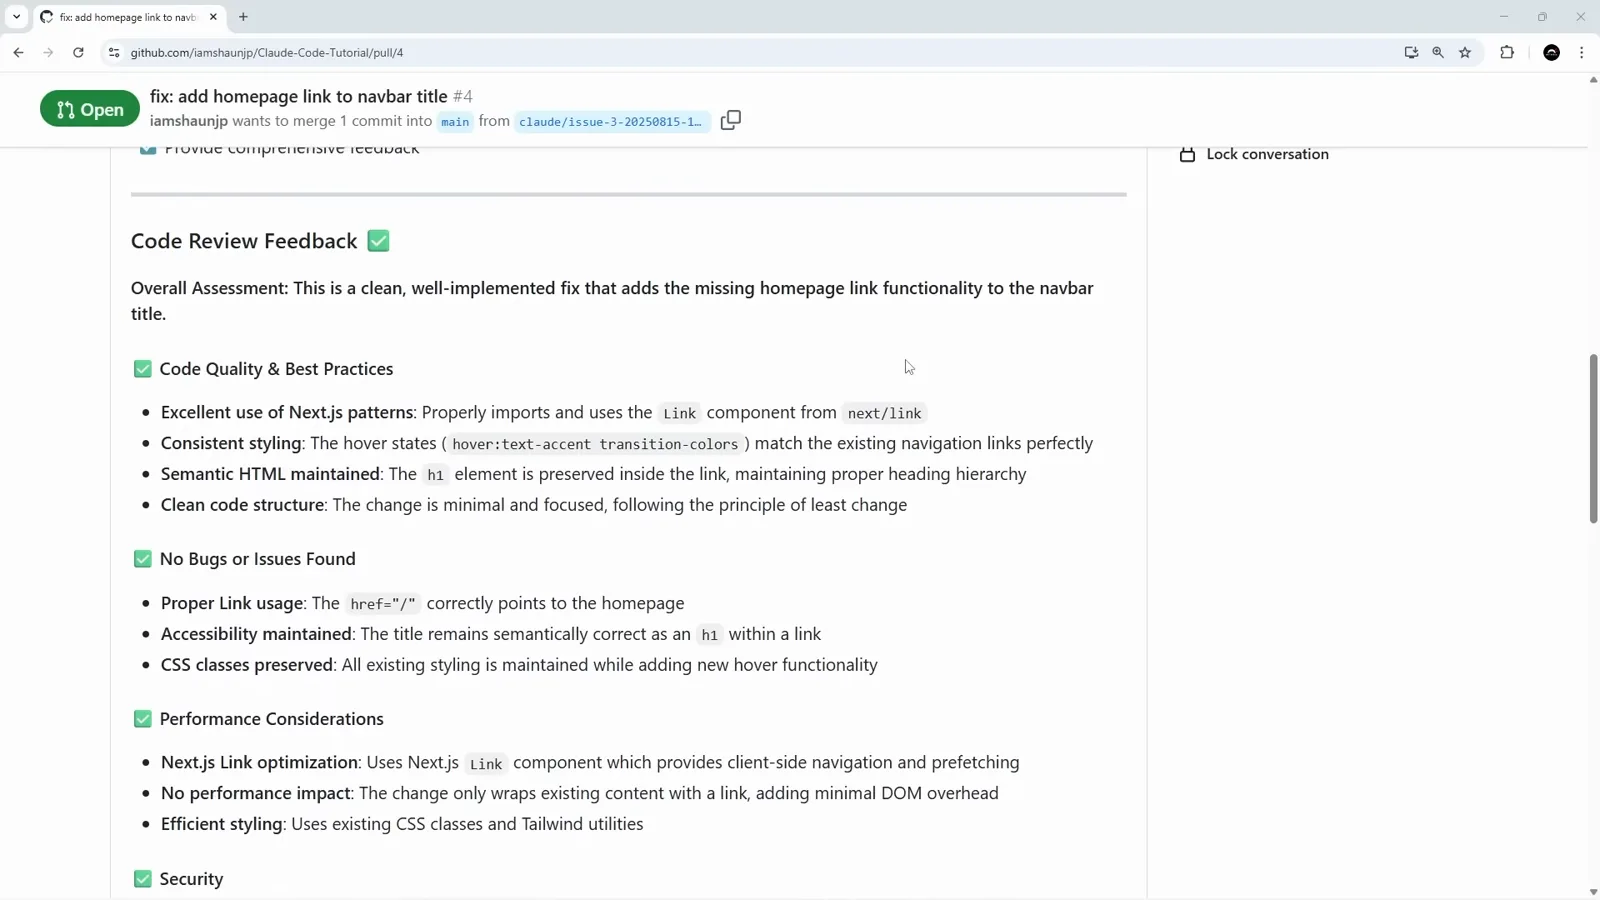
同一个 PR 上两个机器人:一个写了代码,一个负责读这段代码。看 4:58 处的画面 - 15
合并——提交作者仍然是人
合并框里预填的是 "Merge pull request #4 from iamshaunjp/claude/issue-3-20250815-1450",扩展描述用 PR 标题,下面一行写着这次提交将由仓库所有者的 noreply 邮箱署名,而不是机器人。代码是 Claude 写的,但 git 历史里记下的是按下合并的那个人。
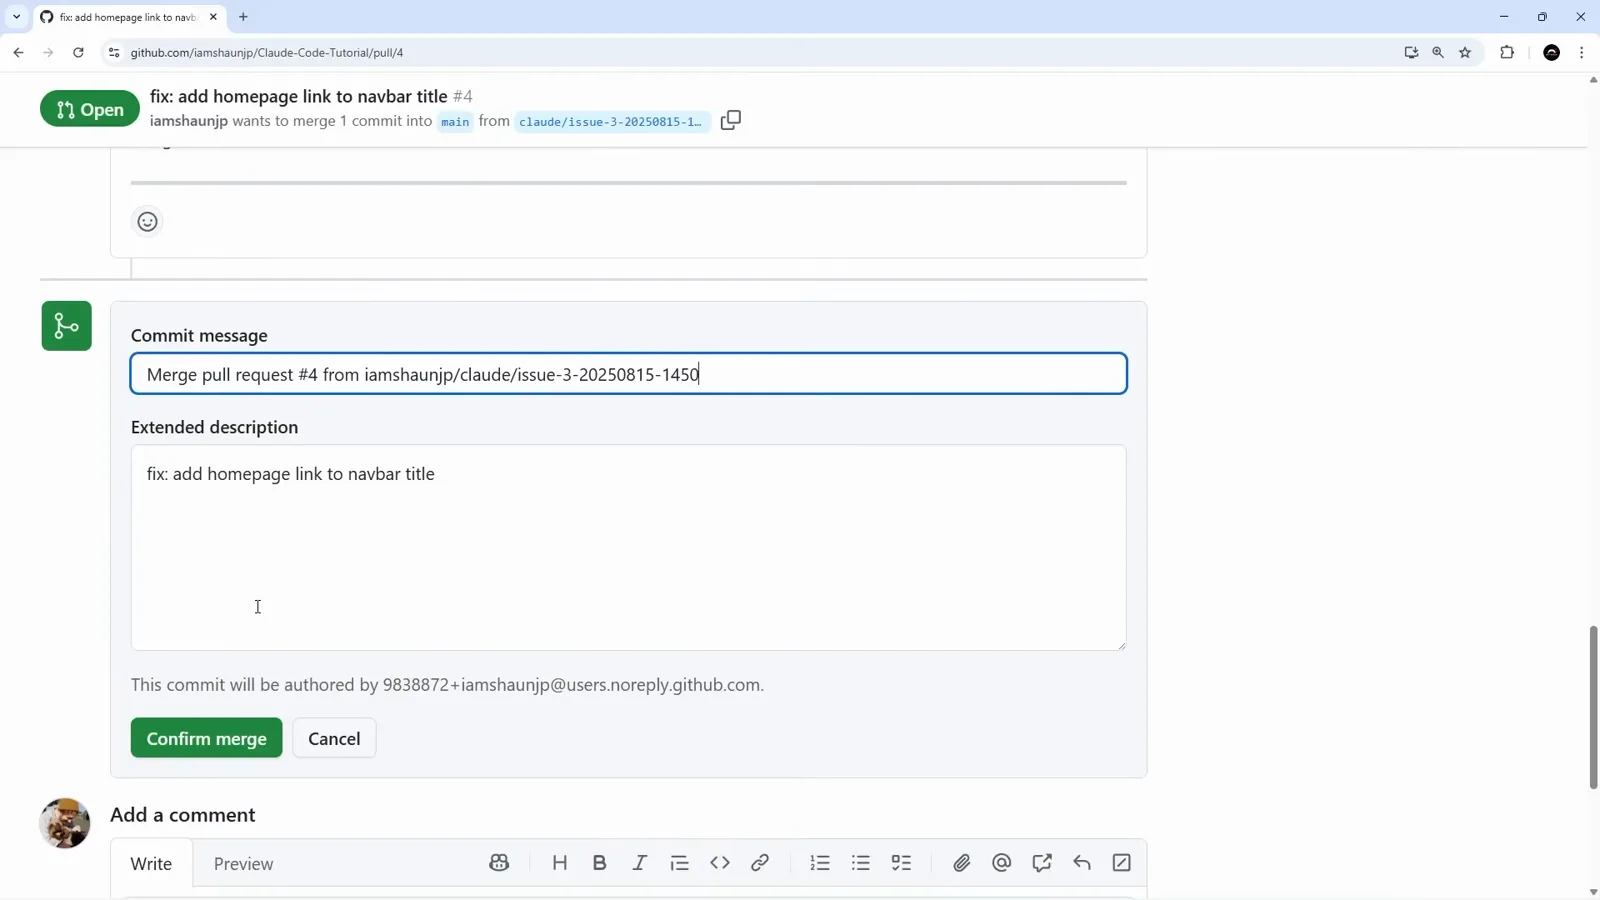
git blame 指向人类。在共享仓库上推这套流程之前,这一点最好先知道。看 5:13 处的画面 - 16
整条链路在 Actions 页面复盘
两个工作流一共八次运行,把整件事讲清楚了。Claude Code 记录了 Issue 被创建、@claude 评论、机器人自己的回复,以及 PR 上的后续动作;Claude Code Review 记录了对 PR #4 的审查,跑在分支 claude/issue-3-20250815-1450 上,耗时 1 分 11 秒。那些只是被提及触发的运行一秒就结束了,因为它们只负责排队。当有人抱怨 @claude 没反应时,该看的就是这一页。
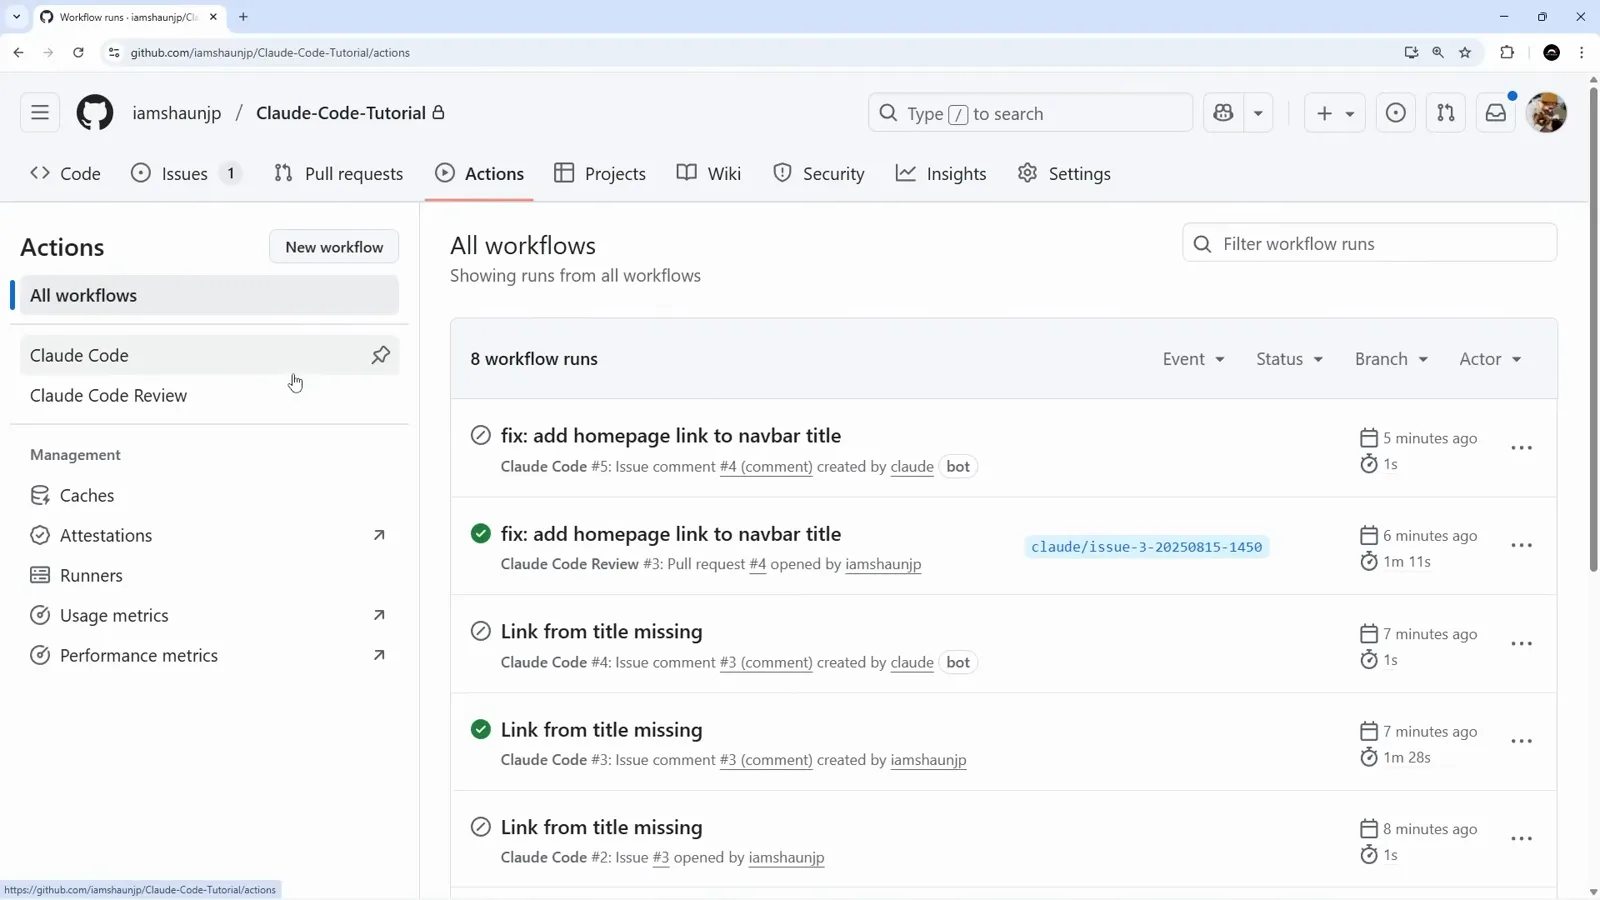
运行时长把两类任务分得很干净:一秒是交接,一分钟是真在读代码。看 5:40 处的画面